
Install the AO Master Discord bot
This page walks an owner (or a staff member with the Manage Integrations permission) through wiring the AO Master bot up to a Discord server. End-to-end it's two phases: a Discord login screen that adds the bot to your server, and a short slash-command wizard that links the bot to your AO Master guild and creates a private settings channel.
Prerequisites
- You're the owner of the Discord server, or you have the Discord Manage Server permission there.
- You've already created your AO Master guild on the web (Quick Start — Owners) — that's the guild this bot will pair to. If you haven't, see the Create New alternative in §4 below.
- About 5 minutes.
Step 1 — Open the Invite Bot button on the web
Open AO Master, click your guild in the sidebar, then go to Management → Discord Integration. When the bot isn't linked yet, the page shows a Not paired yet card with three numbered steps.
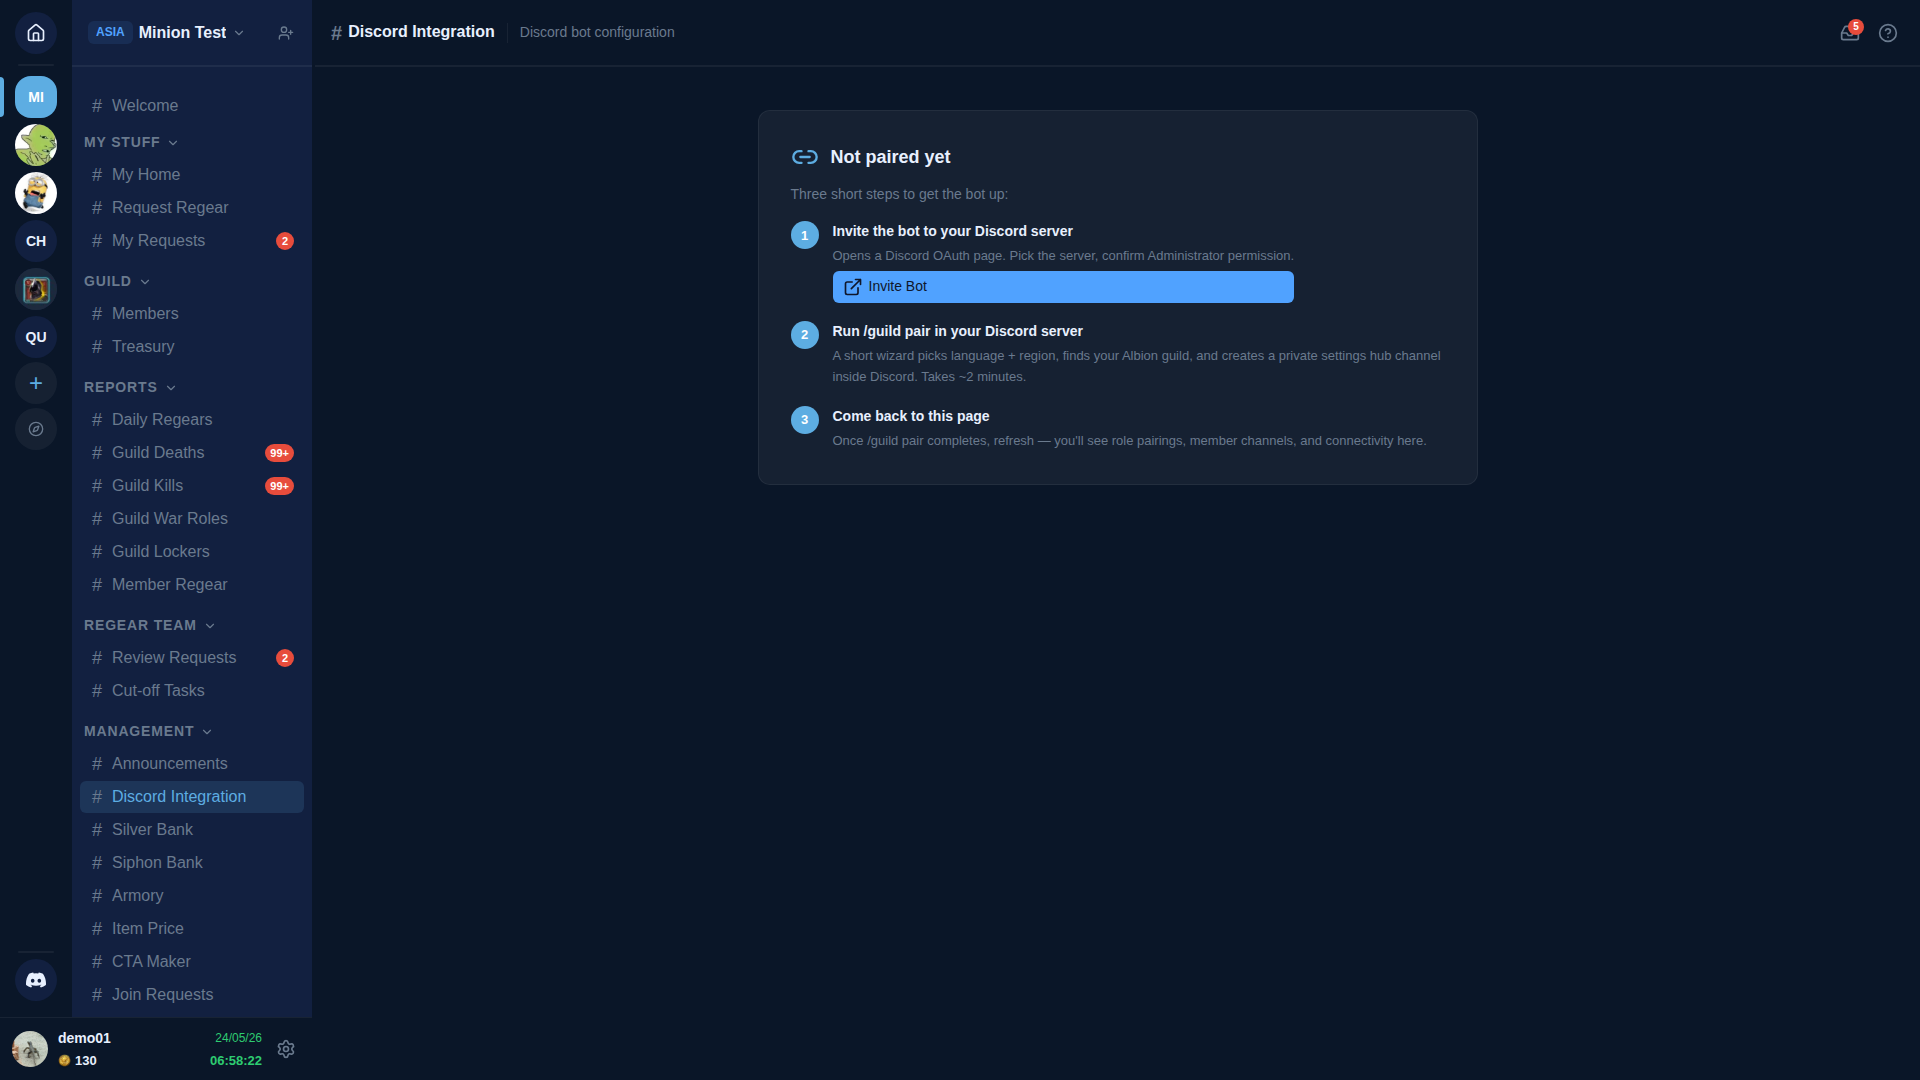
Click the blue Invite Bot button in step 1. It opens a new browser tab on Discord's authorization page.
Step 2 — Authorize the bot on Discord
The Discord authorization page asks you to pick which server to add the bot to.
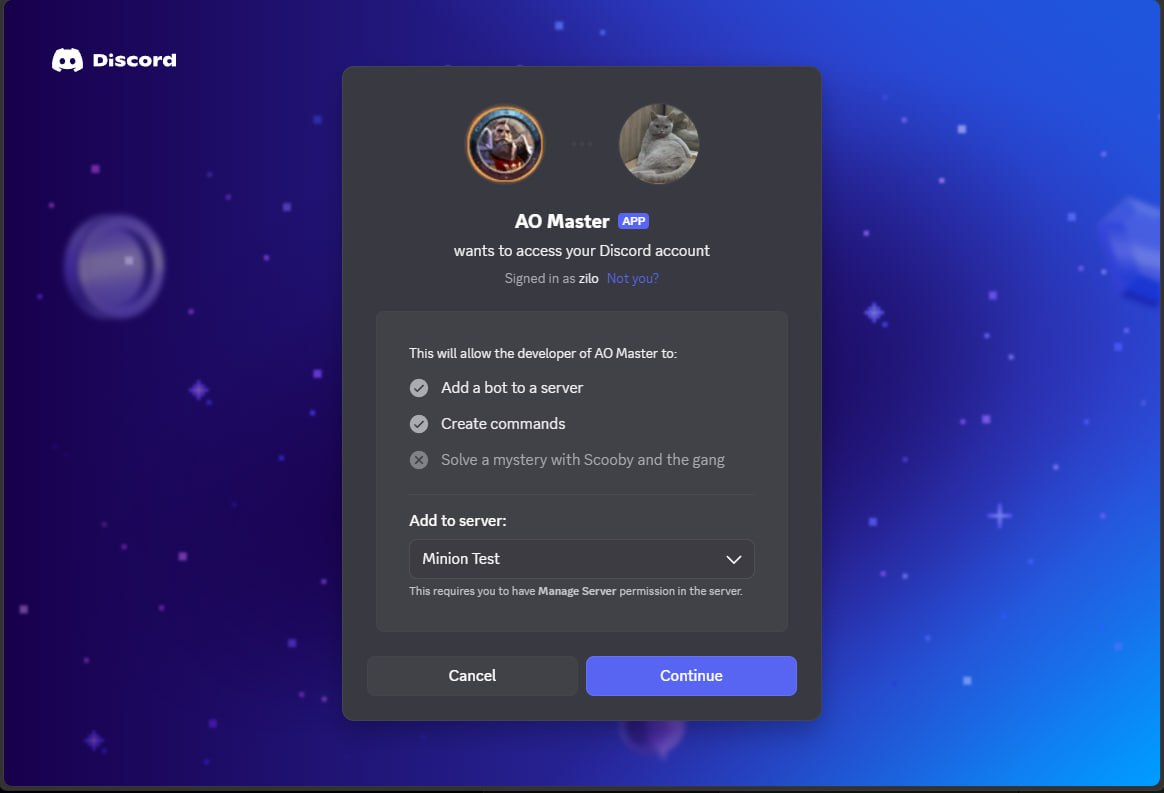
Pick your server from the Add to server dropdown, then click Continue.
"Solve a mystery with Scooby and the gang"?
That's a placeholder line Discord puts on every authorization page to remind you what permissions are NOT being requested. It's harmless — just Discord's playful way of saying "the app didn't ask for this."
Discord then shows the exact permissions the bot will be granted on your server.
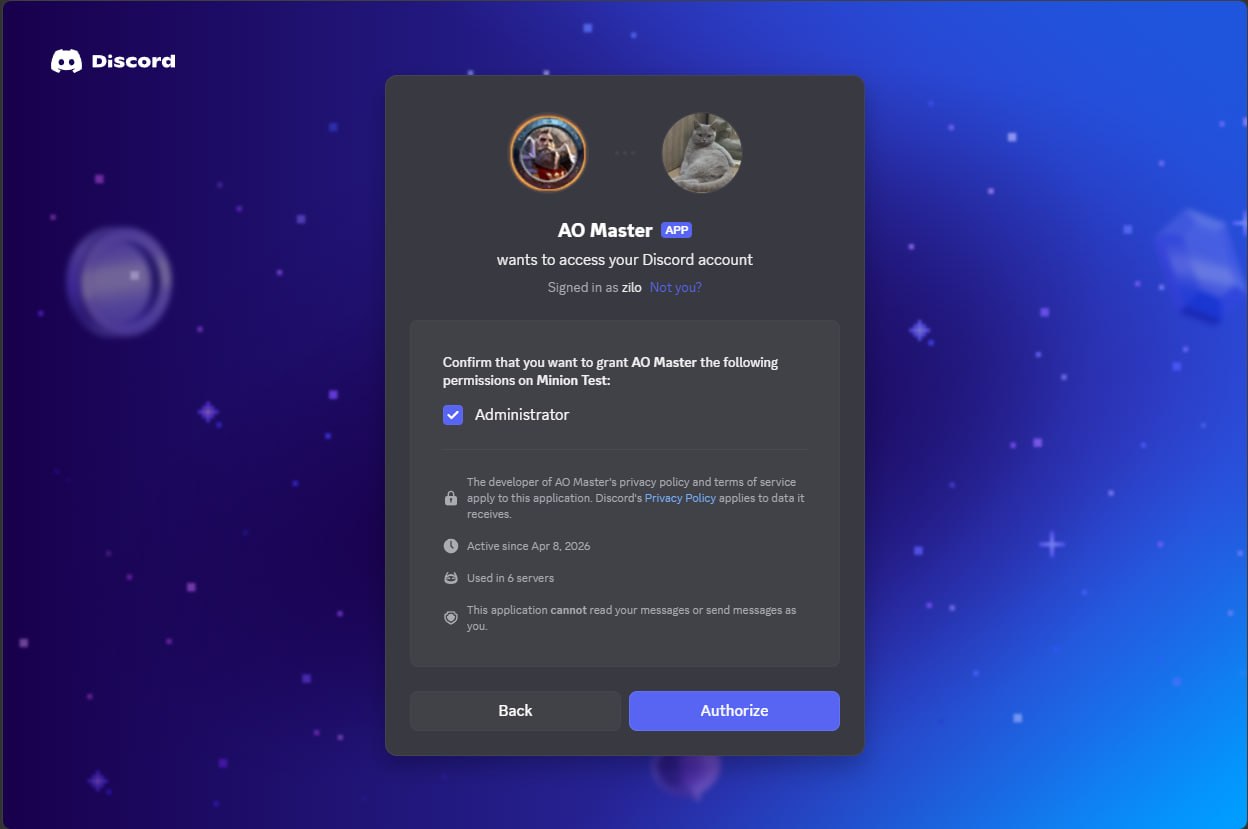
The bot asks for the Administrator permission. This is what lets it create its own category and channels, manage role assignments to keep web ↔ Discord in sync, and post into channels it owns. Click Authorize.
Administrator is broad — that's intentional
Discord doesn't expose finer-grained permissions for bots that need to manage their own channel structure. The bot does not read your messages or send messages on your behalf (Discord prints both guarantees right on the authorization page). If you'd rather keep the bot off a server, just don't run /guild pair there — see Unpair at the bottom of this page.
A success screen confirms the bot has joined.
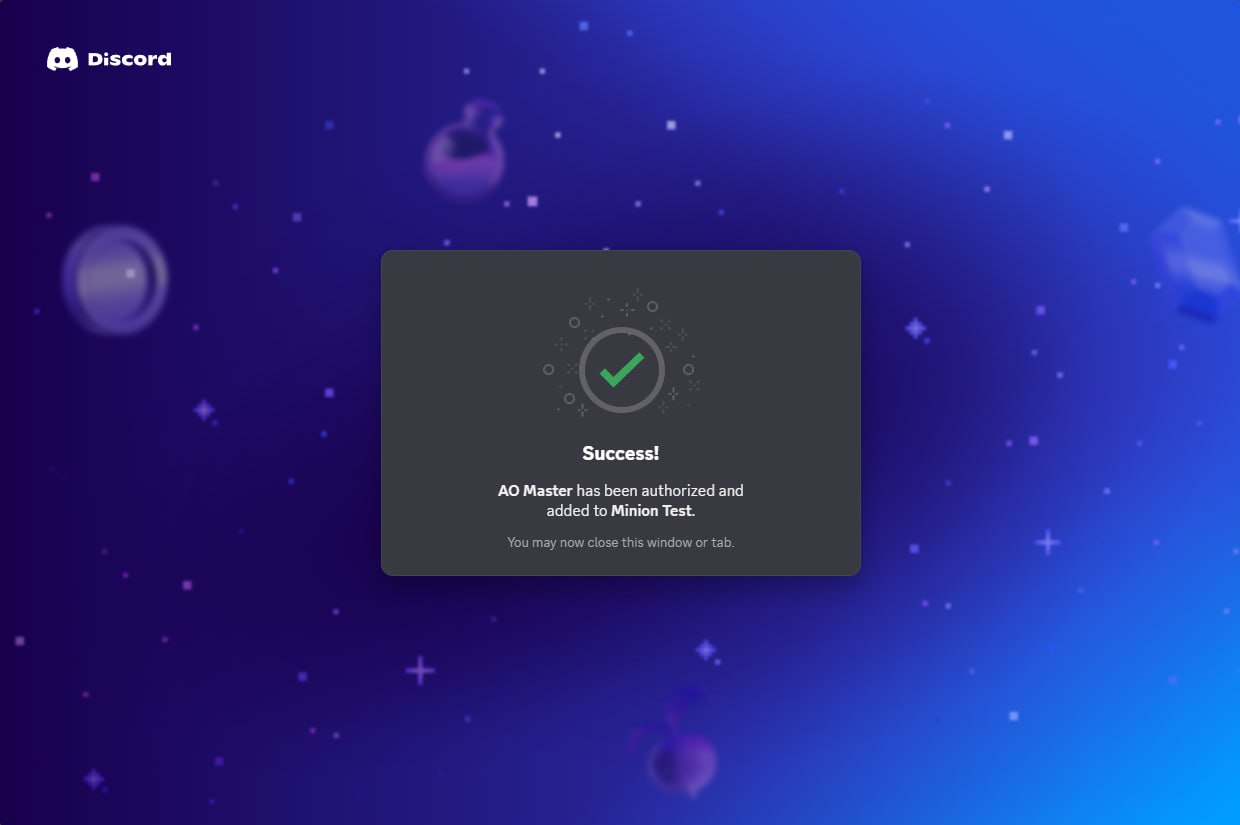
Close the tab. Switch back to Discord proper.
Step 3 — Run /guild pair
In any text channel on your Discord server, type /guild pair. Discord shows an autocomplete dropdown — pick the highlighted entry.

Press Enter. The bot replies with a private wizard message that only you can see.
"Only you can see this"
Every wizard step is marked Only you can see this · Dismiss message at the bottom — Discord's way of saying the message is private to the person who ran the slash command. Nobody else in the server sees the buttons, the dropdowns, or your answers.
Step 4 — Pick a language
The first wizard screen asks which language you'd like the bot to reply in from here on.
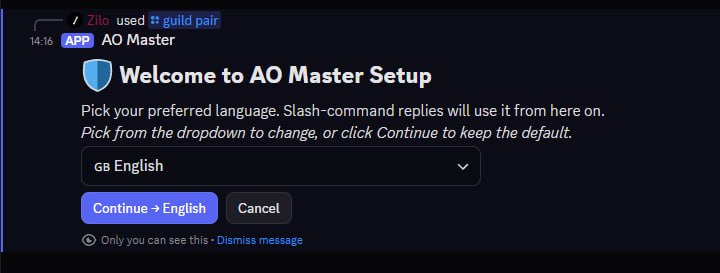
The dropdown defaults to your Discord client's language. To pick something else, open it — the bot supports 15 languages.
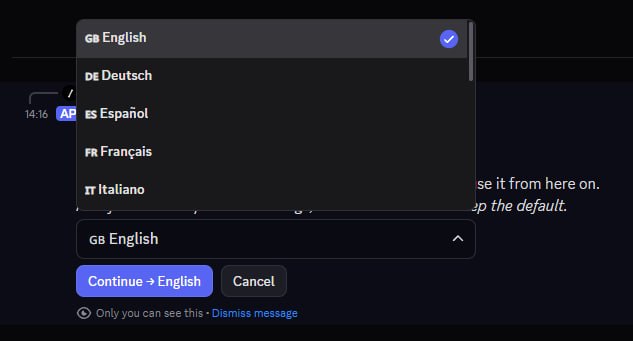
Pick the language, then click Continue → (the button label updates with your pick). You can change it later from the web Settings.
Step 5 — Pick which AO Master guild to pair
If you already own AO Master guilds on the web, the next screen lists them and lets you pair this Discord server to one of them. (If you don't have any yet, you can create one right here — see the box below.)
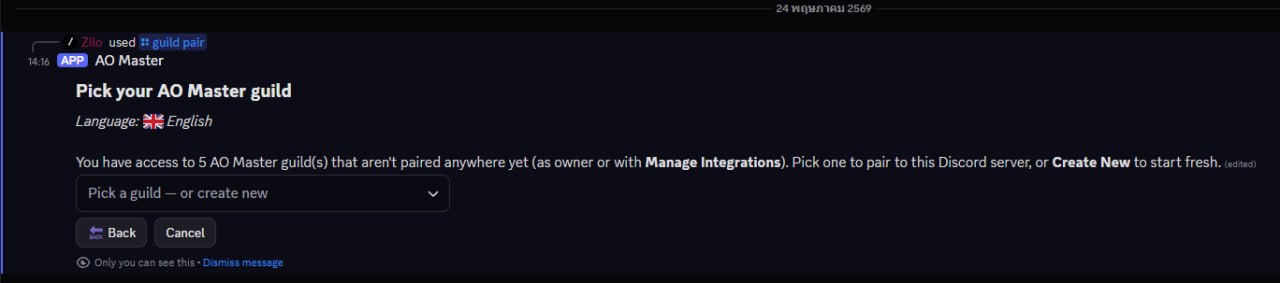
Open the dropdown. Each row shows the AO Master guild name plus its Albion-game guild ID and region.
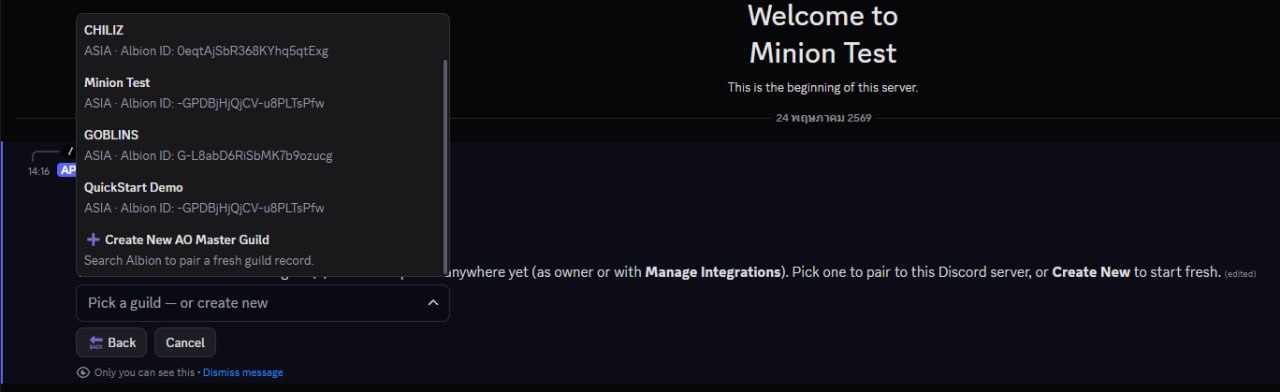
Pick the guild you want this Discord server to control.
Create New — alternative path
If you don't have a matching AO Master guild yet, click + Create New AO Master Guild instead. The wizard branches into a region picker, then a search box where you type your Albion guild's name; the bot calls Albion's live API, finds the guild, and creates the AO Master record + pairs this Discord server in one step. You become the AO Master owner automatically.
The Create New path adds two extra wizard screens but lands at the same Confirm card in §6 below — the rest of the install is identical.
Step 6 — Confirm re-pair
Before doing anything irreversible, the bot shows a confirmation screen with everything it's about to do.
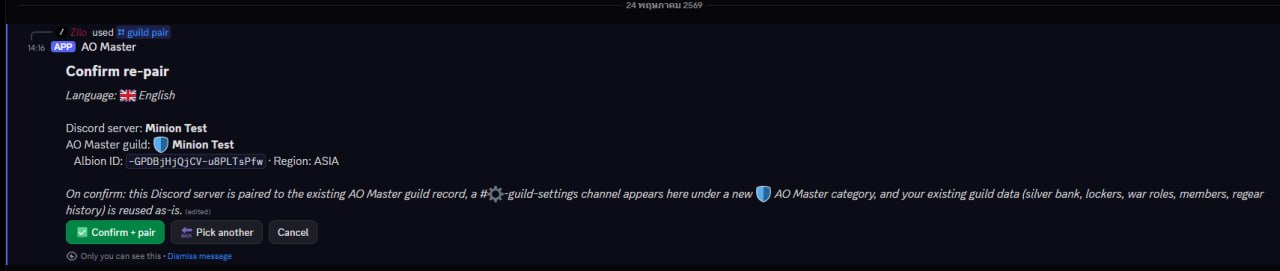
Read the line that starts with "On confirm:" — it's literally everything that's about to happen.
- A new 🛡 AO Master category appears on your Discord server.
- A single #⚙️-guild-settings channel goes inside it.
- The web side starts trusting the bot to mirror role assignments + deliver messages to this Discord server.
- Your existing AO Master data (silver bank balances, lockers, war roles, member list, regear history) stays intact — pairing just connects the wires, it doesn't reset anything.
Click ✅ Confirm + pair when you're ready. A short loading screen appears while the bot writes everything down.

Step 7 — Pair the Member role
Once the pair lands, the wizard immediately moves into role-mapping. The first step is required: pick which Discord role represents your regular members.
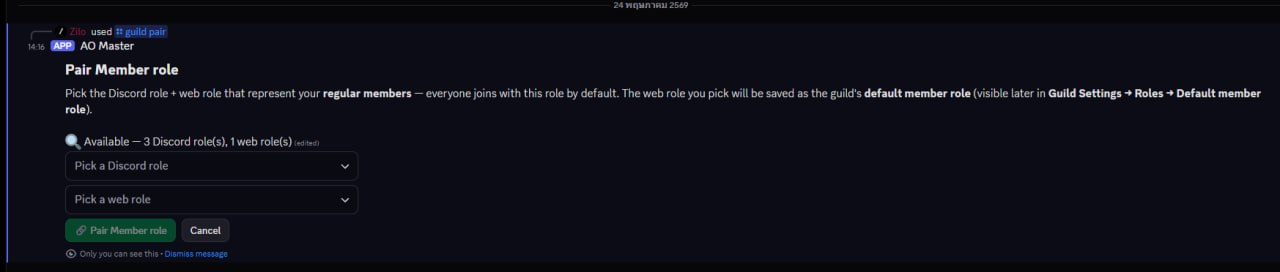
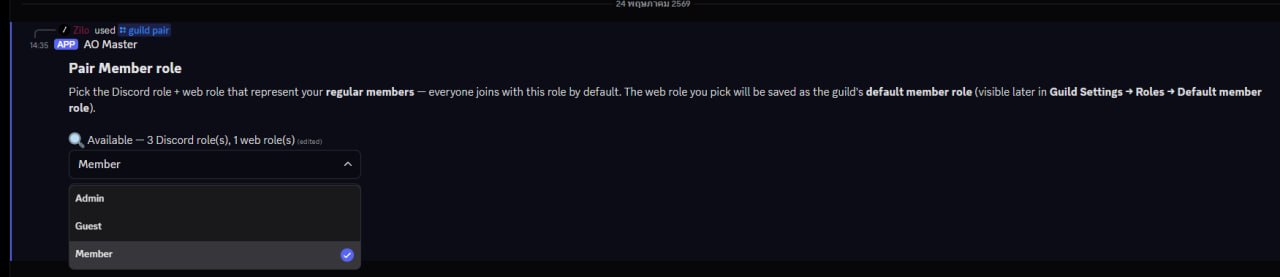
Open the Pick a Discord role dropdown and pick the role new members should get on Discord. The bot lists every assignable role in your Discord server — usually called something like "Member" or "@everyone".
Then open the Pick a web role dropdown. If you just created your AO Master guild, there will be one preset role waiting — the default Member role.
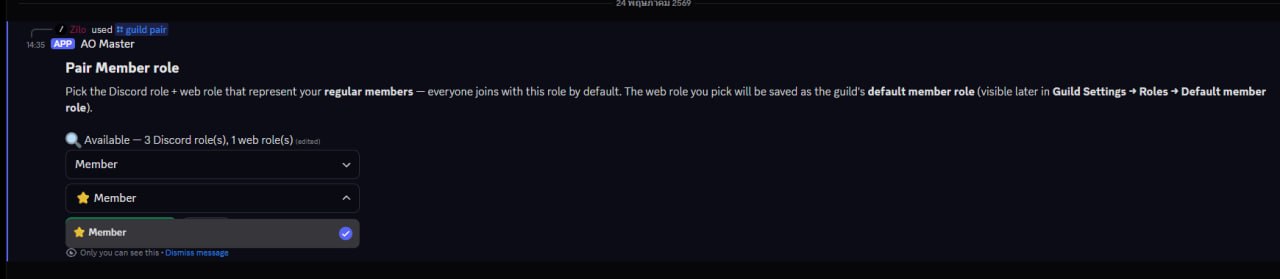
Pick the two and click 🔗 Pair Member role. The chosen web role becomes the guild's default member role, so anyone who joins on Discord later (via an Enlist ticket) automatically lands in the right slot on both sides.
Step 8 — Pair other roles (optional)
After the Member pair lands, the bot offers an optional extra pass to wire more role pairs in one go.
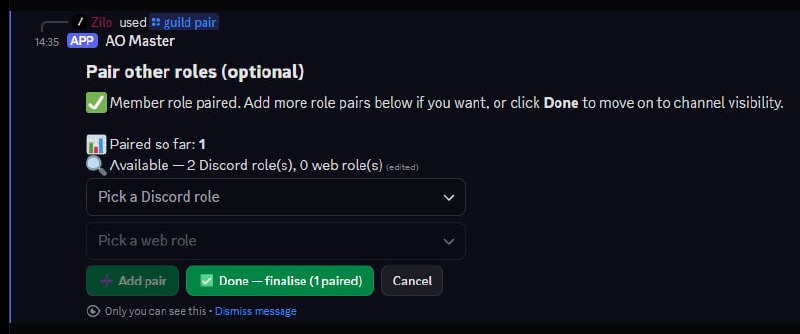
Skip this step if you don't have anything else to pair yet — clicking ✅ Done — finalise moves on. You can come back and add more pairs any time from the web Discord Integration → Roles tab.
Step 9 — Pick channel visibility
The last decision: which Discord roles can see the new 🛡 AO Master category.
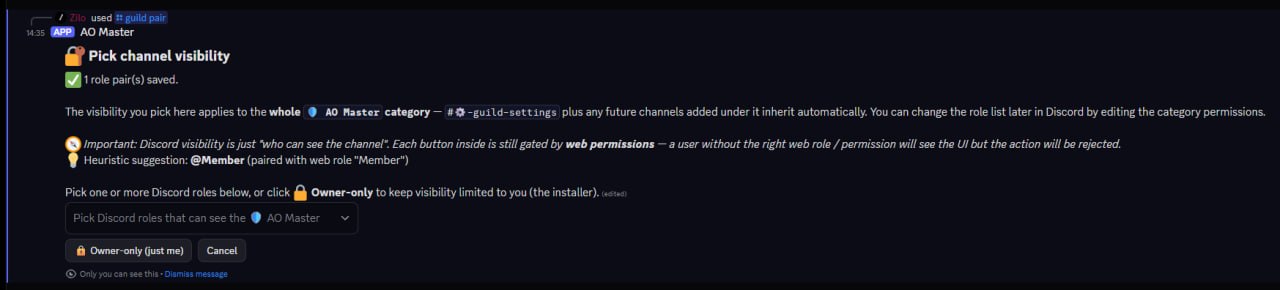
Two callouts in this screen are worth reading carefully:
- Visibility ≠ permission. Letting a Discord role see the channel is separate from letting it use the buttons inside. The buttons are gated by web permissions (set on Settings → Roles → Permissions). Granting visibility just decides who can find the channel in their channel list.
- Owner-only is a quick "lock it down to me until I figure things out" option. You can broaden later by editing the category permissions in Discord directly.
Open the dropdown to see every Discord role on your server.
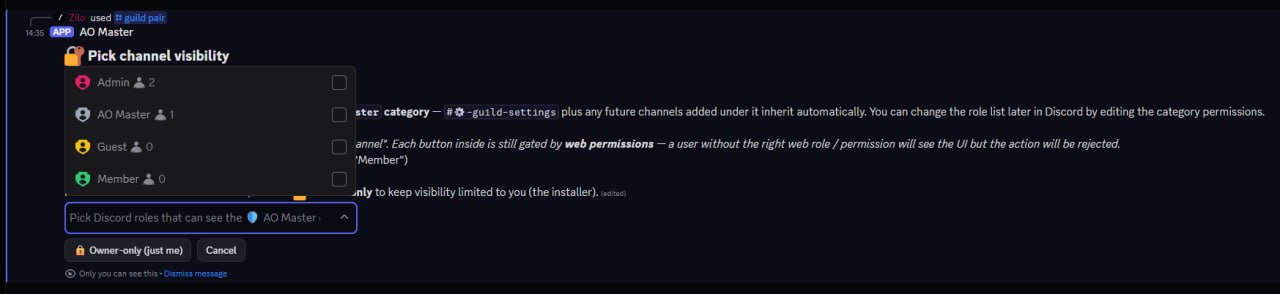
Tick one or more roles. The dropdown supports multi-select — picked roles appear as removable chips below the dropdown.
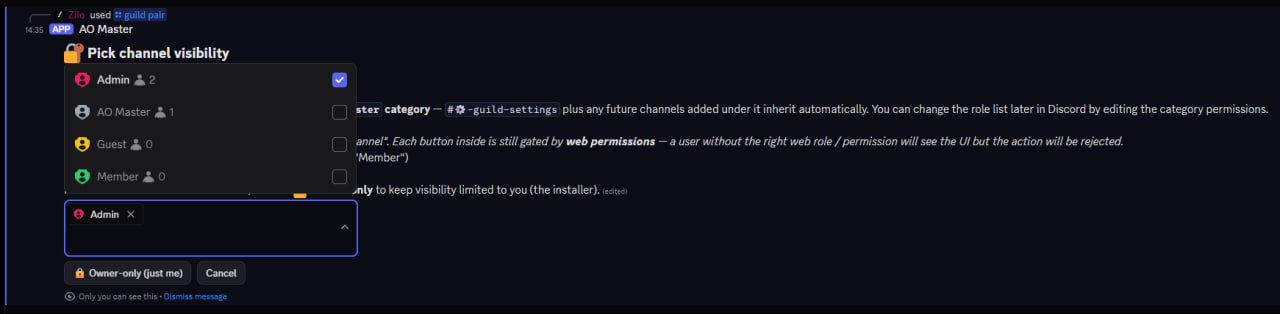
The AO Master role
You'll notice an AO Master entry in the dropdown — that's the role Discord auto-created for the bot itself when it joined. The bot uses it internally to bypass visibility rules; you don't need to (and shouldn't) tick it.
As soon as you finalise your pick, the wizard wraps up.
Step 10 — All set
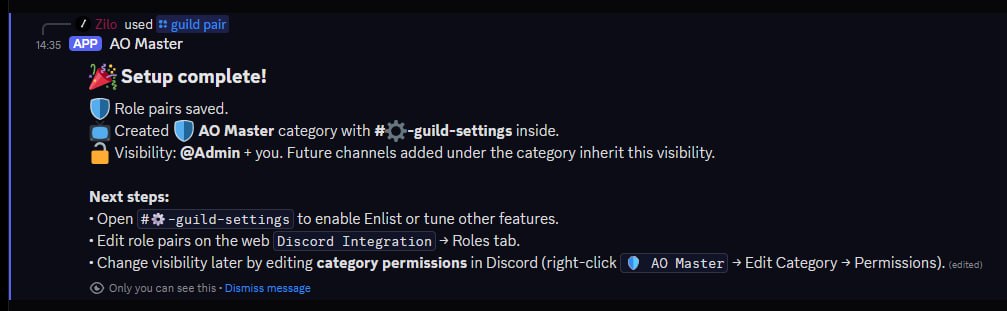
Your sidebar now has a fresh 🛡 AO Master category with #⚙️-guild-settings inside.
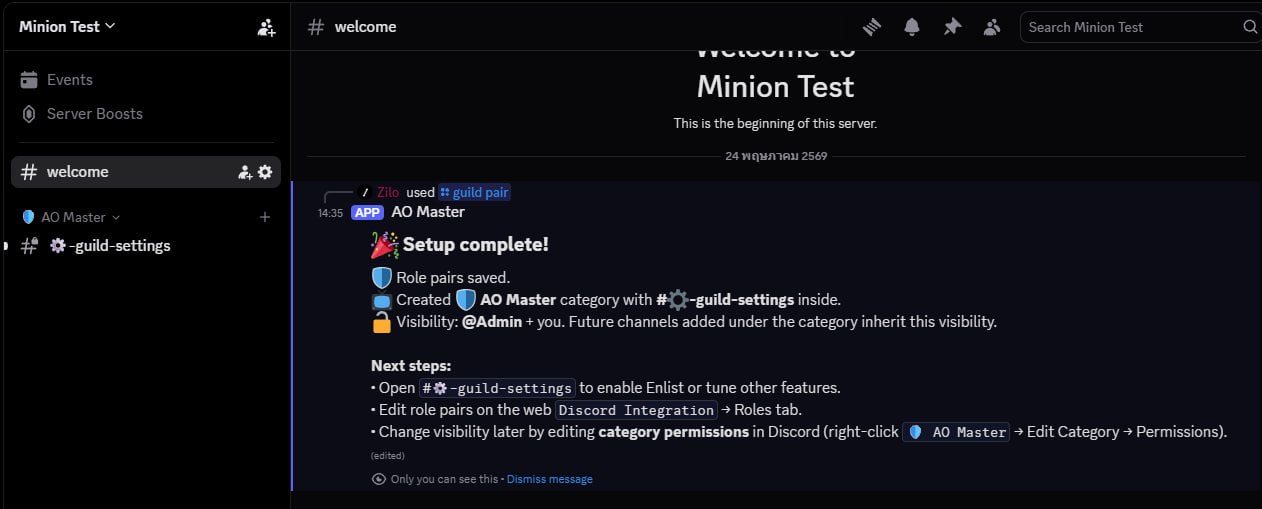
That's it — the bot is live. From here:
- Open #⚙️-guild-settings to enable Enlist tickets, configure role sync, and tune the other Discord-side features. The pinned message in that channel is your one-stop control panel; the Channels overview page walks through everything on it.
- Back on the web, Discord Integration now shows a green Active state with role pairings, member channels, and the live connection state.
After install — what's next
| You want to… | Where to go |
|---|---|
| Enable Enlist tickets so applicants can join via Discord | #⚙️-guild-settings → Enable Enlist button (see Enlist flow) |
| Enable the Ally pipeline so partner-guild members can apply as allies | #⚙️-guild-settings → Enable Ally button (see Ally flow) — Pro tier |
| Enable Regear request posts in Discord | #⚙️-guild-settings → Enable Regear button |
| Map more roles | Web Discord Integration → Roles tab |
| Map war roles to Discord roles | Web Discord Integration → War Roles tab |
| Map partner-guild Discord roles for ally approvals | Web Discord Integration → Ally → Partner Discord roles |
| Add or remove Discord roles that can see the category | Right-click 🛡 AO Master category in Discord → Edit Category → Permissions |
| See every channel + button the bot creates | Channels overview |
| Link your Albion character | Run /whoami in any AO Master channel, then follow the link prompt |
Unpair
If you ever want to remove the bot from a Discord server:
- On the web, open Discord Integration → Settings → Unpair.
- Type UNPAIR to confirm.
The bot deletes its 🛡 AO Master category and channels in Discord, drops role mappings, and clears the member-channel directory. Your AO Master guild data (members, roles, banks, regear history) is preserved — only the Discord-side wiring is cut. You can re-pair any time by running /guild pair again on a new (or the same) Discord server.
Cross-links
- Channels overview — the channels and buttons the bot creates + manages.
- Enlist flow on Discord — applicants apply to your guild via Discord tickets.
- Ally flow on Discord — partner-guild members apply as allies (Pro tier).
- Member ops on Discord — linking characters, role sync, manage purges from the bot side.
- Slash commands appendix — every slash command the bot exposes.
- Settings → Discord Integration — the web mirror of everything on this page.