
Enlist flow on Discord
Enlist is the canonical way to join an AO Master guild from Discord. One applicant click opens a private review ticket. A recruiter walks through a short wizard to verify the Albion character, assigns initial war roles, and creates the AO Master account in one go. Then the recruiter closes the ticket and a full transcript lands in a forum channel for the record.
This page walks the whole pipeline — from the owner setting it up the first time, to the applicant clicking the button, to the recruiter running the two slash commands that approve and close. Each phase has its own section below.
Prerequisites
- The bot is paired to your AO Master guild — see Install + pair.
- The person setting it up either is the Discord server owner or holds the Manage Integrations permission in AO Master.
- You already have one Discord role that will play the part of "recruiter" — anyone with that role can review tickets. If none exists, create one in Discord first.
1. Owner — set up the Enlist hub
The hub gets provisioned from #⚙️-guild-settings. Two clicks open the Manage Enlist panel; another two pick recruiter roles and confirm; the bot creates the channels.
Open the Manage Enlist panel
Open #⚙️-guild-settings and click the green 🎯 Enable Enlist button in the pinned Guild Settings message. (The button reads 🎯 Manage Enlist once Enlist is configured.) An ephemeral panel appears:
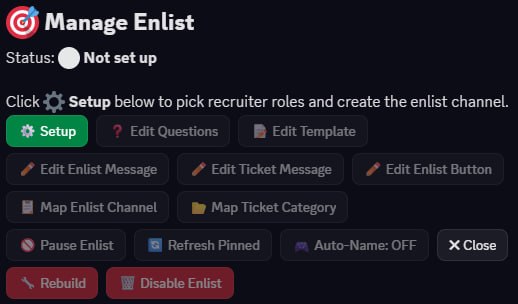
Most of those buttons stay greyed-out functionally until provisioning is done. Click the green ⚙ Setup button in row 1.
Step 1 — pick recruiter Discord roles
The wizard's first screen asks which Discord roles can review tickets.

Open the dropdown to see your server's roles, with the live member-count next to each:
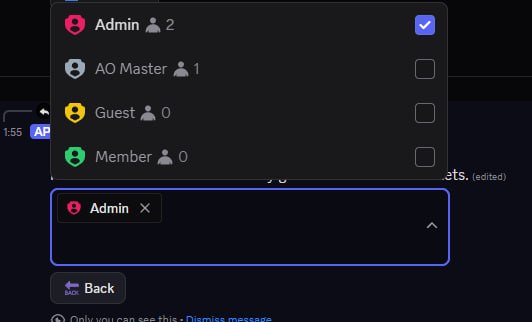
Pick one or more roles. Anyone with one of these roles will see the per-applicant tickets and be allowed to run /enlist review and /enlist done inside them. After you click out of the dropdown, the wizard advances automatically.
Don't pick @everyone or managed bot roles
The wizard refuses both — applicants would see every ticket, which defeats the privacy of the per-applicant channel.
Step 2 — confirm
A short confirmation card lists what's about to happen.

Click ✅ Confirm. The card flips to a working state while the bot creates the channels (typically under 5 seconds).
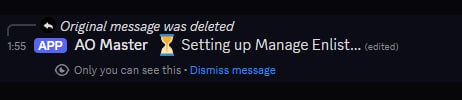
Done — the panel re-renders in "Accepting applicants" state
When provisioning finishes the same message updates again, this time to the full Manage Enlist dashboard:
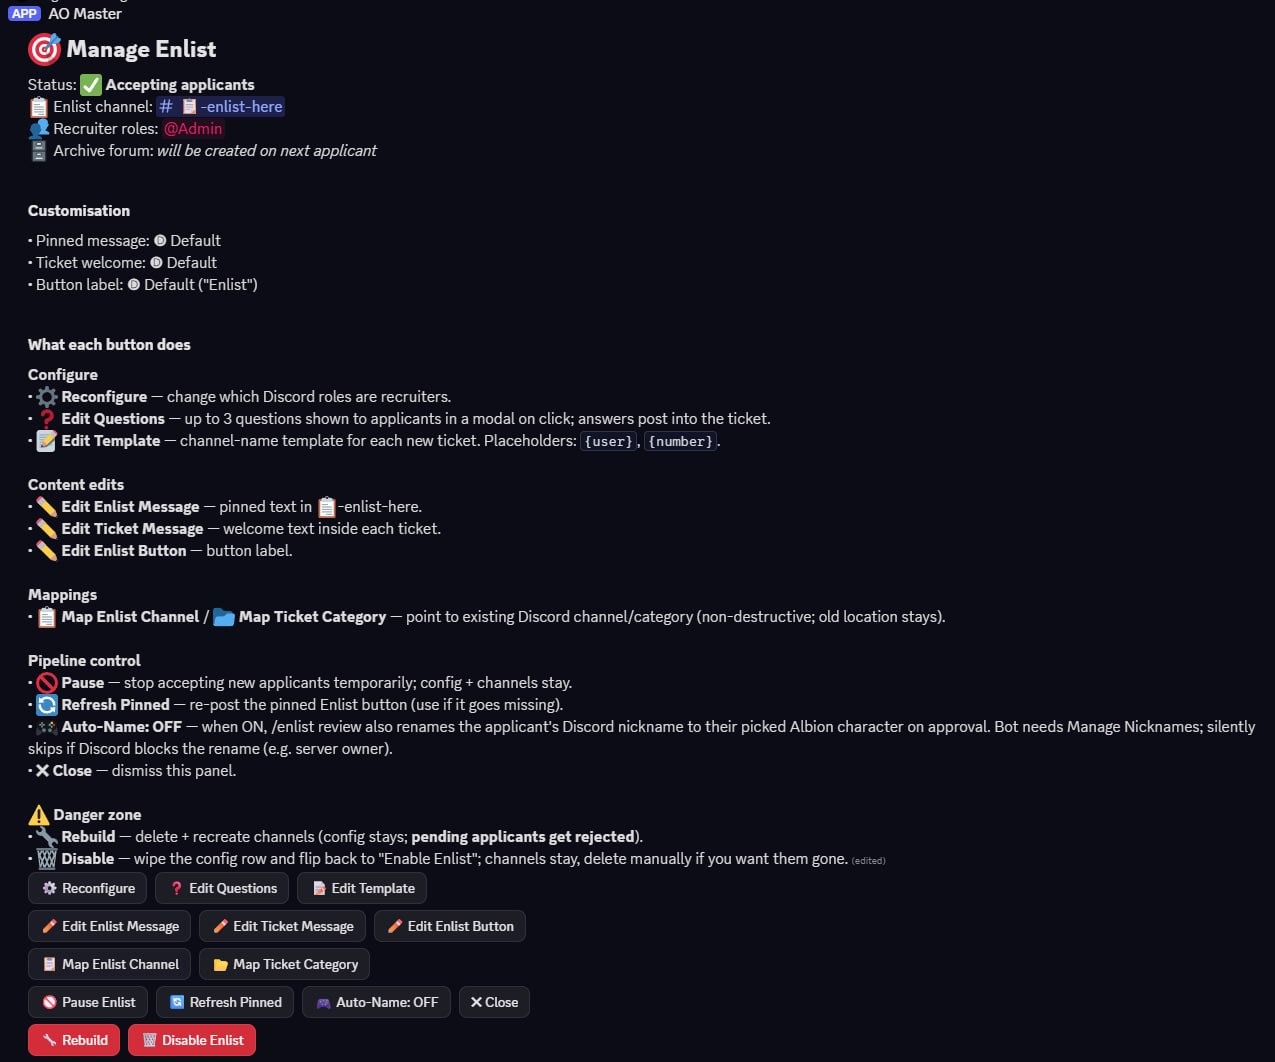
Your Discord sidebar now has a new 🎯 Enlist category with one channel inside — #📋-enlist-here. The archive forum doesn't exist yet on purpose: it's created the first time a recruiter runs /enlist done, so a guild that never archives anything doesn't carry an empty forum around.
You can close this panel with ✖ Close. To customise the pinned message, ticket welcome body, button label, or the channel-name template for new tickets, come back through #⚙️-guild-settings → 🎯 Manage Enlist and use the matching Edit … button — or change the same settings on the web at Management → Discord Integration → Enlist.
2. Applicant — click [Enlist]
For everyone who isn't already in the guild yet, the entry point is #📋-enlist-here — the only channel they can see inside the 🎯 Enlist category.
![Discord channel view of #📋-enlist-here. Left sidebar shows the Minion Test server with categories: Events, Server Boosts, # welcome, ▼ AO Master (containing #⚙️-guild-settings), ▼ Enlist (containing the currently-selected #📋-enlist-here). Main panel: the channel intro "Welcome to # 📋-enlist-here" and the bot's pinned message titled "📋 Enlist into this guild — Click below to open a private review ticket with our recruiters. They'll chat with you about your build, schedule, and what region/timezone you play. The ticket is only visible to you and the recruiter team." A blue [✉ Enlist] button sits below the message.](/images/discord-enlist-flow/05-enlist-here-pinned.jpg)
Click [✉ Enlist]. Discord shows a brief "thinking" indicator while the bot creates your private channel:

A second later the bot replies with a link to the new ticket (visible only to you):

Click the channel link. You're now inside your personal review ticket. The bot has tagged you and the recruiter role(s), and posted a welcome message with a checklist of what to tell the recruiters:
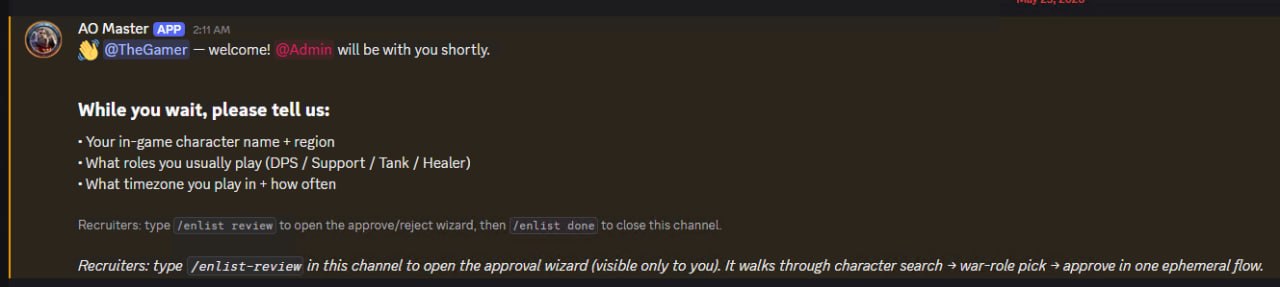
From here it's a normal Discord conversation — answer the questions, ask anything you want about the guild, wait for a recruiter to respond. There is no expiry on the ticket; it stays open until a recruiter closes it.
The channel name comes from a template
By default the ticket channel is named enlist-{your-discord-username} (so the example above became #enlist-siam-bot). Owners can change the template via 🎯 Manage Enlist → 📝 Edit Template — the placeholder {user} substitutes the applicant's username and {number} is a counter that increments on every new ticket. The actual channel name in your guild depends on what the owner picked.
3. Recruiter — run /enlist review
When the conversation in the ticket gets to "yes, let's add this person", the recruiter switches from chat to the slash-command wizard. Everything below is ephemeral — only you see it, not the applicant.
Type /enlist to see the three Enlist subcommands:
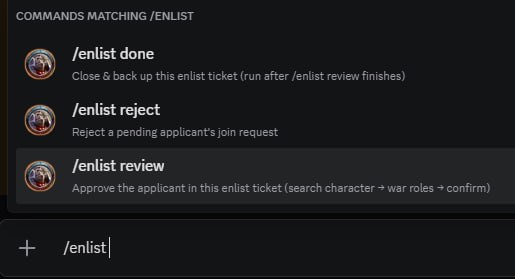
Pick /enlist review and press Enter.
Step 1 — find the applicant's Albion character
A modal opens asking for the applicant's character name.
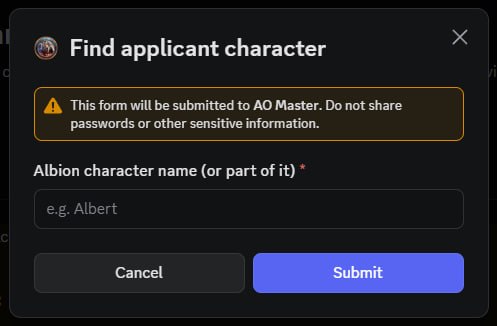
Type the name the applicant told you. Partial matches are fine — the bot calls Albion's live search API and gets back up to ten candidates.
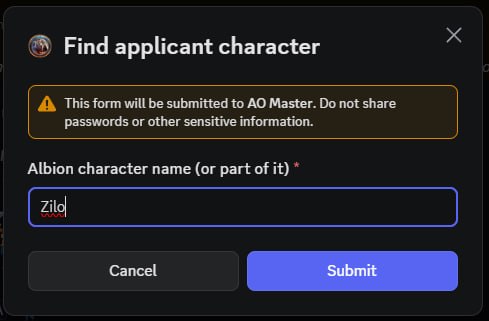
Click Submit.
Step 2 — pick the right character from the search results
The bot replaces the modal with a results card. Each candidate shows the in-game name + Albion ID + their current guild affiliation (or 🏃 Solo).
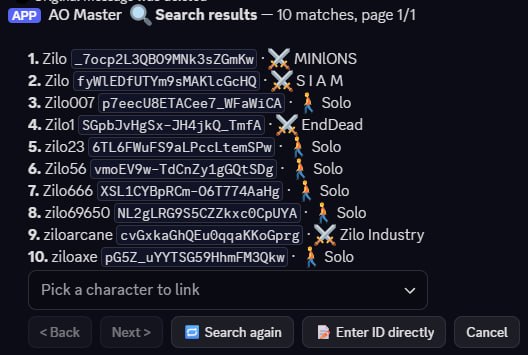
Open the dropdown to make your pick:
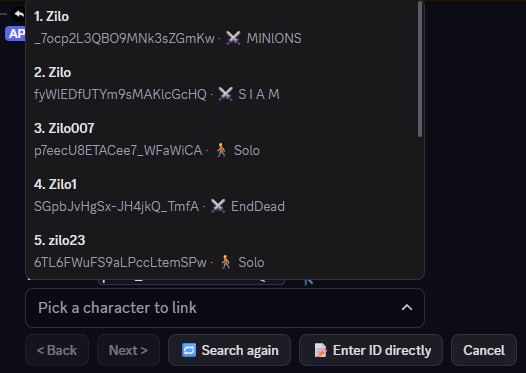
If the right person isn't on this page — or if you already know their Albion character_id (e.g. from the ticket conversation) — use the helpers below the dropdown:
- 🔁 Search again opens the search modal again with a fresh name.
- 📝 Enter ID directly opens a modal where you can paste the exact Albion
character_id(32-character hex string). Useful when the in-game name has special characters or there are too many matches. - < Back / Next > paginate when the result set has more than ten matches.
Step 3 — confirm the character
After you pick, the bot shows a one-line summary so you can double-check.
![Discord ephemeral message titled "🛡 Step 3 — Confirm character". Below it: "Discord user: @TheGamer", "Albion: 🎮 Zilo [_7ocp2L3QBO9MNk3sZGmKw] · ASIA · ⚔ MIN1ONS". Italic note: "Confirm to lock in this character and move to war-role selection." Three buttons: ✅ Confirm character (green) · 🔁 Re-select · Cancel.](/images/discord-enlist-flow/09-review-step3-summary.jpg)
If it doesn't match the applicant's claim, click 🔁 Re-select to go back to the results dropdown. Otherwise click ✅ Confirm character.
Step 4 — assign war roles (optional)
The bot loads your guild's war-role list from Settings → War Roles on the web and shows them as a multi-select.
![Discord ephemeral message titled "🛡 Step 4 — War roles". Line: "🛡 Zilo [_7ocp2L3QBO9MNk3sZGmKw]". Body: "Pick the war roles to assign on approval. Skip to leave the applicant without war roles (staff can add them later from the Members panel)." A "Pick war roles (multiple allowed)" dropdown (collapsed). Buttons below: Skip — no war roles · 🔙 Back · Cancel.](/images/discord-enlist-flow/10-review-step4-war-roles.jpg)
Open the dropdown to see what's available — exactly the war roles configured on the web side.
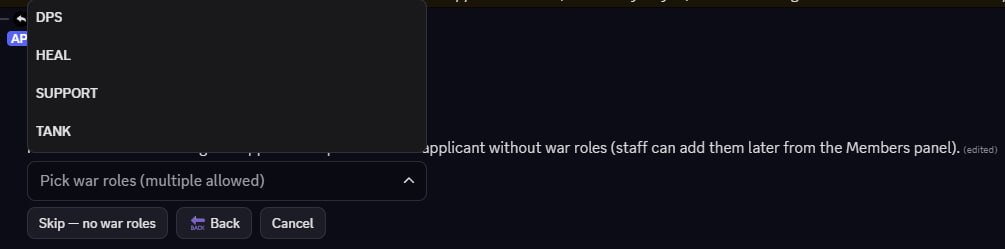
Tick any combination. Selected roles show as pill chips below the dropdown:
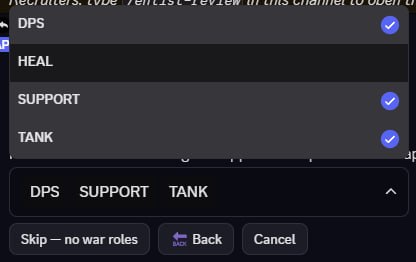
You don't have to pick anything here
Skip — no war roles is a perfectly normal choice — recruiters often assign war roles later from the web #Members panel once they've seen the new member play. If your guild hasn't configured any war roles yet, this dropdown will be empty and Skip is the only option.
After picking (or skipping), the wizard moves to its last step.
Step 4.5 — pick a locker (only when the guild requires one)
If your guild has the Require Locker setting on (web: Settings → Lockers), the wizard inserts an extra locker-pick step between war roles and the final approve. You'll see a card asking which locker group to use, with an ⚡ Quick Assign option that auto-picks the least-occupied locker for you. Pick a group → pick a locker → continue.
Guilds without locker tracking skip this step entirely.
Step 5 — final approve
A summary card pulls together every decision so you can sanity-check before pulling the trigger.
![Discord ephemeral message titled "🛡 Step 5 — Approve applicant". Four data rows: Discord user: @TheGamer · Albion: 🛡 Zilo [_7ocp2L3QBO9MNk3sZGmKw] · ASIA · ⚔ MIN1ONS · Web role: Member (guild default) · War roles: DPS, SUPPORT, TANK. Italic note: "On approve: member is created, character is linked, default web role + selected war roles are assigned, the join request is marked approved." Buttons: ✅ Approve (green) · 🔙 Back · Cancel.](/images/discord-enlist-flow/11-review-step5-final-approve.jpg)
Click ✅ Approve.
No default web role configured?
If you haven't set a "guild default" web role under Settings → Roles → Use as default, the approve card flips the Web role line to a warning and the bot creates the applicant with no web roles at all. They'll still be a member of the guild, but no permissions — you'll need to grant them roles from the web #Members panel after approval.
4. After Approve — the ticket stays open
The wizard messages were all ephemeral. The first thing everyone (applicant + recruiter) sees in the ticket channel is the bot's public confirmation:
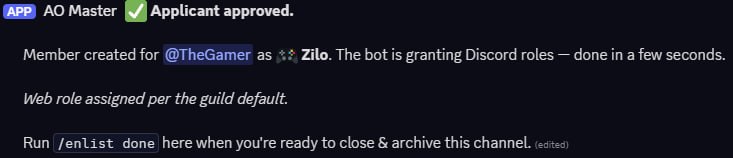
A few seconds later the applicant picks up their assigned Discord role(s) via the web ↔ Discord role-sync chain. If Auto-Name is on (toggle in the Manage Enlist panel), their Discord nickname on this server flips to their Albion character name.
The channel does NOT auto-close on Approve. That's by design — recruiters often want to keep talking to the applicant after approval (welcome chat, "here's our discord etiquette", scheduling their first event, etc). Close the channel only when you're ready — by running /enlist done.
5. Recruiter — close with /enlist done
When you're done chatting in the ticket, type /enlist done:

Press Enter. The bot replies ephemerally and then deletes the channel:

The ticket channel disappears within a second or two. Before it goes, the bot mirrors every message in the conversation into a forum thread inside the auto-managed archive forum:
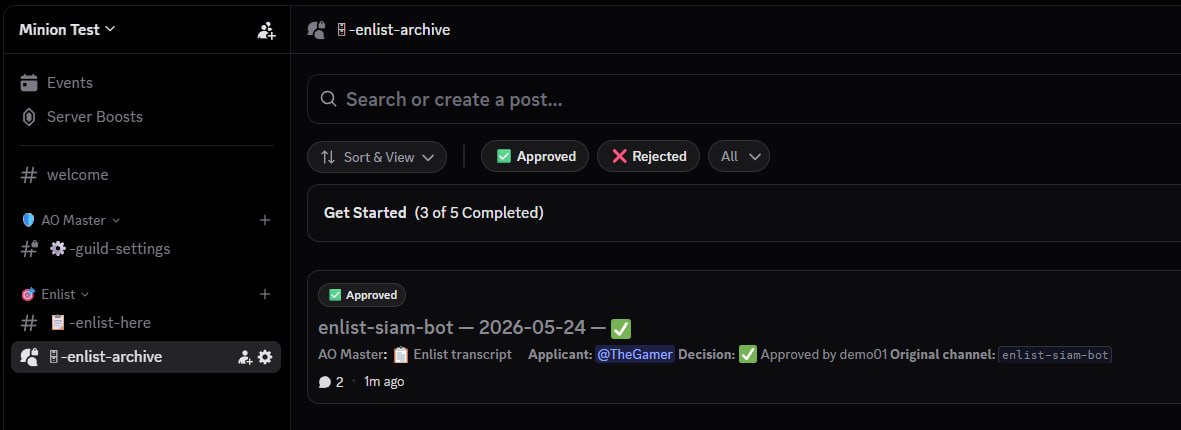
The forum is 🗄 enlist-archive by default. (If you changed the channel-name template to start with a different word, e.g. apply-{user}, the forum is named to match — 🗄 apply-archive.) Each closed ticket becomes one thread tagged either ✅ Approved or ❌ Rejected, with the recruiter's name and original channel name in the body. The transcript preserves original author names, avatars, timestamps, and attachments.
To look up an old application, open the forum and use the search bar or the tag filters at the top.
Rejecting an applicant
Two paths to reject:
/enlist rejectslash command — pass the applicant viauser:@theirnameand optionallyreason:why. The bot DMs the applicant the reason (if you provided one), closes their ticket, and archives the transcript exactly like/enlist donedoes — but the resulting forum thread is tagged ❌ Rejected instead of ✅ Approved.- Cancel mid-review — if you click Cancel anywhere inside the
/enlist reviewwizard, the wizard closes but the ticket stays open. The applicant doesn't know you almost approved them. Decide separately, then run/enlist rejector close the conversation politely first.
There's no in-ticket Reject button on the approval card — the Cancel button only dismisses the wizard, it doesn't reject the applicant. That's intentional: rejecting needs a deliberate second action.
Customising the pipeline
Everything below comes from the 🎯 Manage Enlist panel (#⚙️-guild-settings → 🎯 Manage Enlist) or the equivalent web page at Management → Discord Integration → Enlist. Both edit the same underlying configuration.
| Control | What it changes |
|---|---|
| ⚙ Reconfigure | Swap recruiter Discord roles. Re-runs the Step 1 / Step 2 wizard. |
| ❓ Edit Questions | Up to 3 short questions shown to the applicant as a modal before the ticket opens. The answers post into the ticket as a separate message so recruiters see them immediately. |
| 📝 Edit Template | The channel-name template for each new ticket. Default enlist-{user}. Placeholders: {user} (applicant's Discord username), {number} (per-guild counter). |
| ✏ Edit Enlist Message | The pinned body in #📋-enlist-here — what applicants read before they click the button. |
| ✏ Edit Ticket Message | The "While you wait, please tell us:" body posted inside every fresh ticket. |
| ✏ Edit Enlist Button | The button label. Default "Enlist"; some guilds prefer "Apply" or a localised word. |
| 📋 Map Enlist Channel / 📂 Map Ticket Category | Point the pipeline at an existing Discord channel/category instead of the bot-created defaults. Non-destructive — old location stays where it was. |
| 🚫 Pause Enlist | Stops accepting new applicants temporarily. Existing tickets keep working. Toggle off via the same button (which flips to ✅ Resume Enlist). |
| 🔄 Refresh Pinned | Re-posts the pinned [Enlist] button in #📋-enlist-here. Use if a Discord admin accidentally deleted it. |
| 🎮 Auto-Name: ON / OFF | When ON, /enlist review also renames the applicant's Discord server nickname to their picked Albion character on approval. The bot needs Manage Nicknames on the server (granted by /guild pair's Administrator scope). Silently skips if Discord blocks the rename (e.g. for the server owner). |
| 🔧 Rebuild | Deletes and recreates the channels (#📋-enlist-here + the 🎯 Enlist category). Configuration survives. Open tickets get auto-rejected with a DM to the applicant; they have to click [Enlist] again after the rebuild. |
| 🗑 Disable Enlist | Wipes the configuration row and flips the panel back to "Not set up". Channels stay — delete them manually if you don't want them around. |
What lives where
| Action | How | Where | Who can do it |
|---|---|---|---|
| Apply | Click [✉ Enlist] button | #📋-enlist-here (in the 🎯 Enlist category) | Anyone who can see the channel |
| Chat with the applicant | Just typing | The per-applicant ticket (#enlist-{username} by default) | Applicant + recruiter roles |
| Approve | /enlist review | Inside the ticket | Recruiter roles |
| Reject | /enlist reject user:@… [reason:…] | Anywhere the bot can see | Recruiter roles |
| Close + archive a ticket | /enlist done | Inside the ticket | Recruiter roles |
| Read past applications | Browse threads | 🗄 enlist-archive forum | Recruiter roles |
| Set up / change Enlist config (Discord-side) | 🎯 Manage Enlist panel | #⚙️-guild-settings | Manage Integrations |
| Set up / change Enlist config (web-side) | Management → Discord Integration → Enlist | AO Master web | Manage Integrations |
Cross-links
- Install + pair — set up the bot itself before this page.
- Discord channels overview — what the 🎯 Enlist category contains and how it slots into the wider channel tree.
- Member ops on Discord — the broader "what members do on Discord" surface, including
/whoamiand how role sync works after approval. - Slash commands appendix —
/enlist review,/enlist reject,/enlist donereference rows. - Settings → Discord Integration — the web mirror of pairing + Enlist config.
- Settings → War Roles — the source of the war-role list that Step 4 reads.
- Settings → Roles & Permissions — set a guild default web role so Step 5 doesn't warn about "no roles".