
Crafting Material Planner
The Crafting Material Planner turns "we need to craft 50 Royal Jackets" into an exact shopping list — every material, every tier, every quantity, discounted by the resource return rate your crafter actually gets at each station. Open it from the sidebar under MANAGEMENT → Crafting.
You can plan a single item, mix tiers within one row, group a whole crafting run by region, or pull in everything currently below threshold in the Armory with one button.
Permissions
- View Guild Economy — read saved plans, see calculated totals.
- Manage Guild Economy — create / edit / delete plans, save region return-rate settings, import from low stock.
The channel is gated by tier. Free tier guilds see an upgrade prompt; Basic and higher have access.
Three tabs
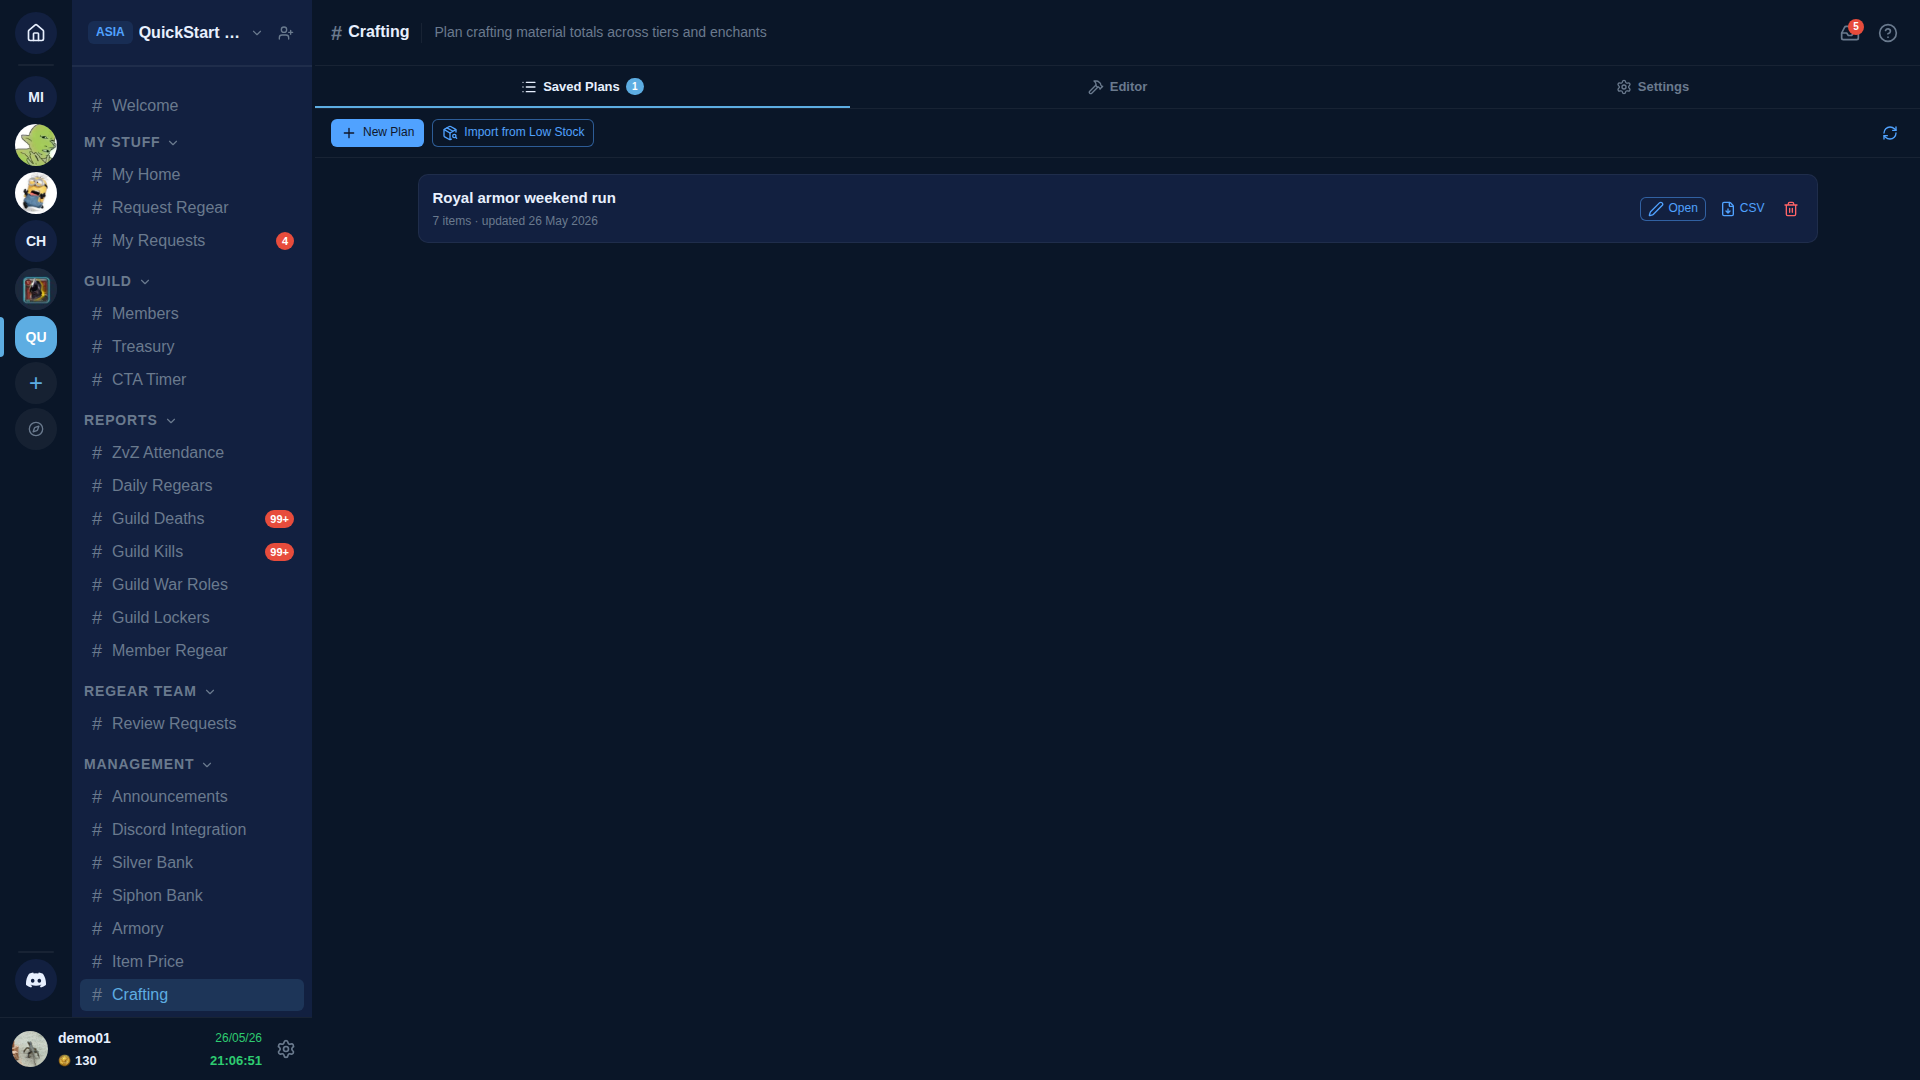
Saved Plans — every plan your guild has saved, newest first. Each card carries the plan title, the count of items in it, and the date last updated. Buttons: Open (load into the editor), CSV (download), 🗑 (delete).
Editor — the active workspace. One row per item, multiple tier × enchant batches per row, materials totalled across all rows. Saving an empty-title plan pops a Save As modal so you can name it.
Settings — per-region resource return rates. The planner uses these to figure out the effective material cost for each row's region.
Region return rate (Settings tab)
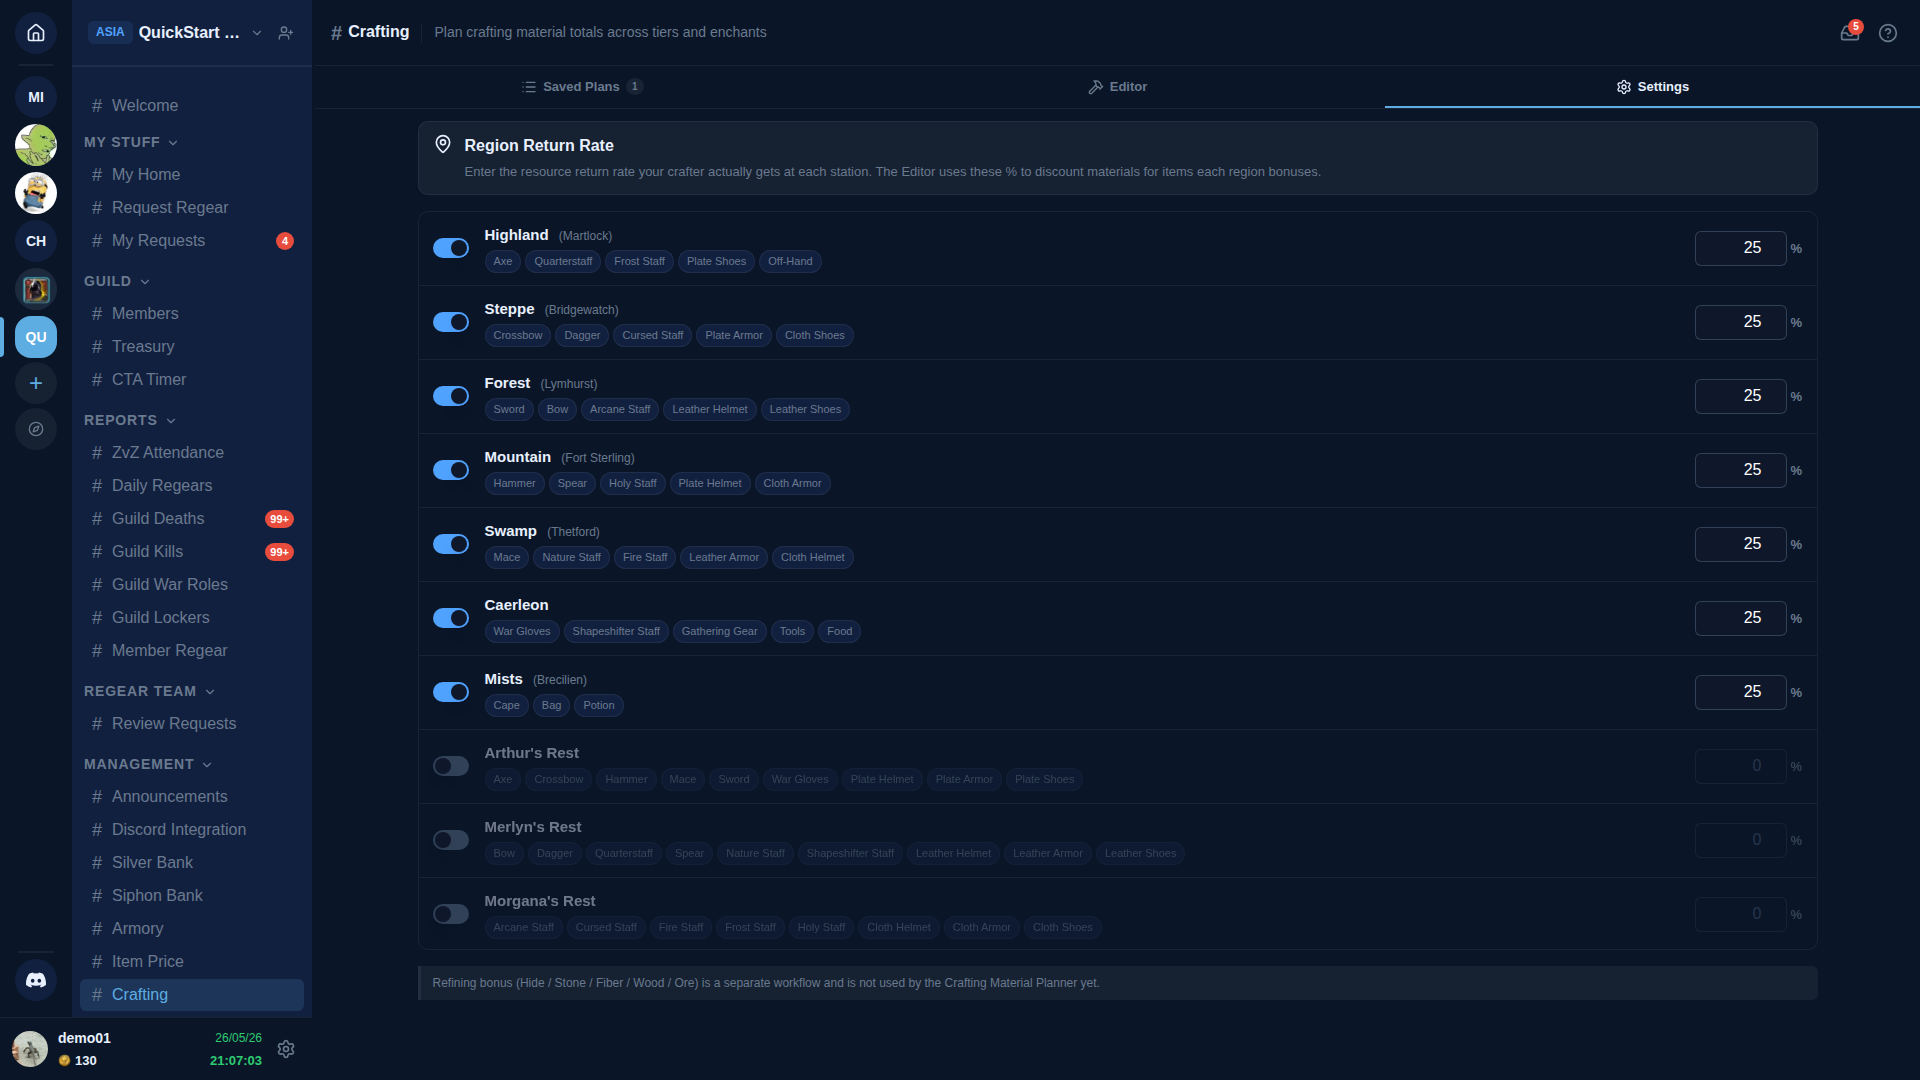
Each region row has three pieces:
- On / off switch. When off, the region is hidden from the editor's region picker. Three outlands rests start off — most guilds craft in royal cities, so flipping these on is opt-in.
- Region name + city — the bonus location label.
- Bonus categories — chips for every weapon / armor / consumable category that region grants a return-rate bonus to (matches the Albion Online wiki resource-return-rate table).
- Return-rate input — the actual percentage your crafter sees in-game. Premium, focus, and crafter fame all affect this number, so different guilds plug in different values. Save with the unsaved-changes bar at the bottom.
A footnote at the bottom reminds you that refining bonus (Hide / Stone / Fiber / Wood / Ore) is a separate workflow not yet covered by the planner.
Building a plan (Editor tab)
Add an item
Click + Add Item in the editor controls (or the tail button below the last row if you've already added some). The Item Picker opens with a search box, slot chip filter (Bag / Cape / Head / Armor / Shoes / Main Hand / Off Hand / Mount / Potion / Food), and a grid of every craftable item. Click an item card to add a row.
One row per item
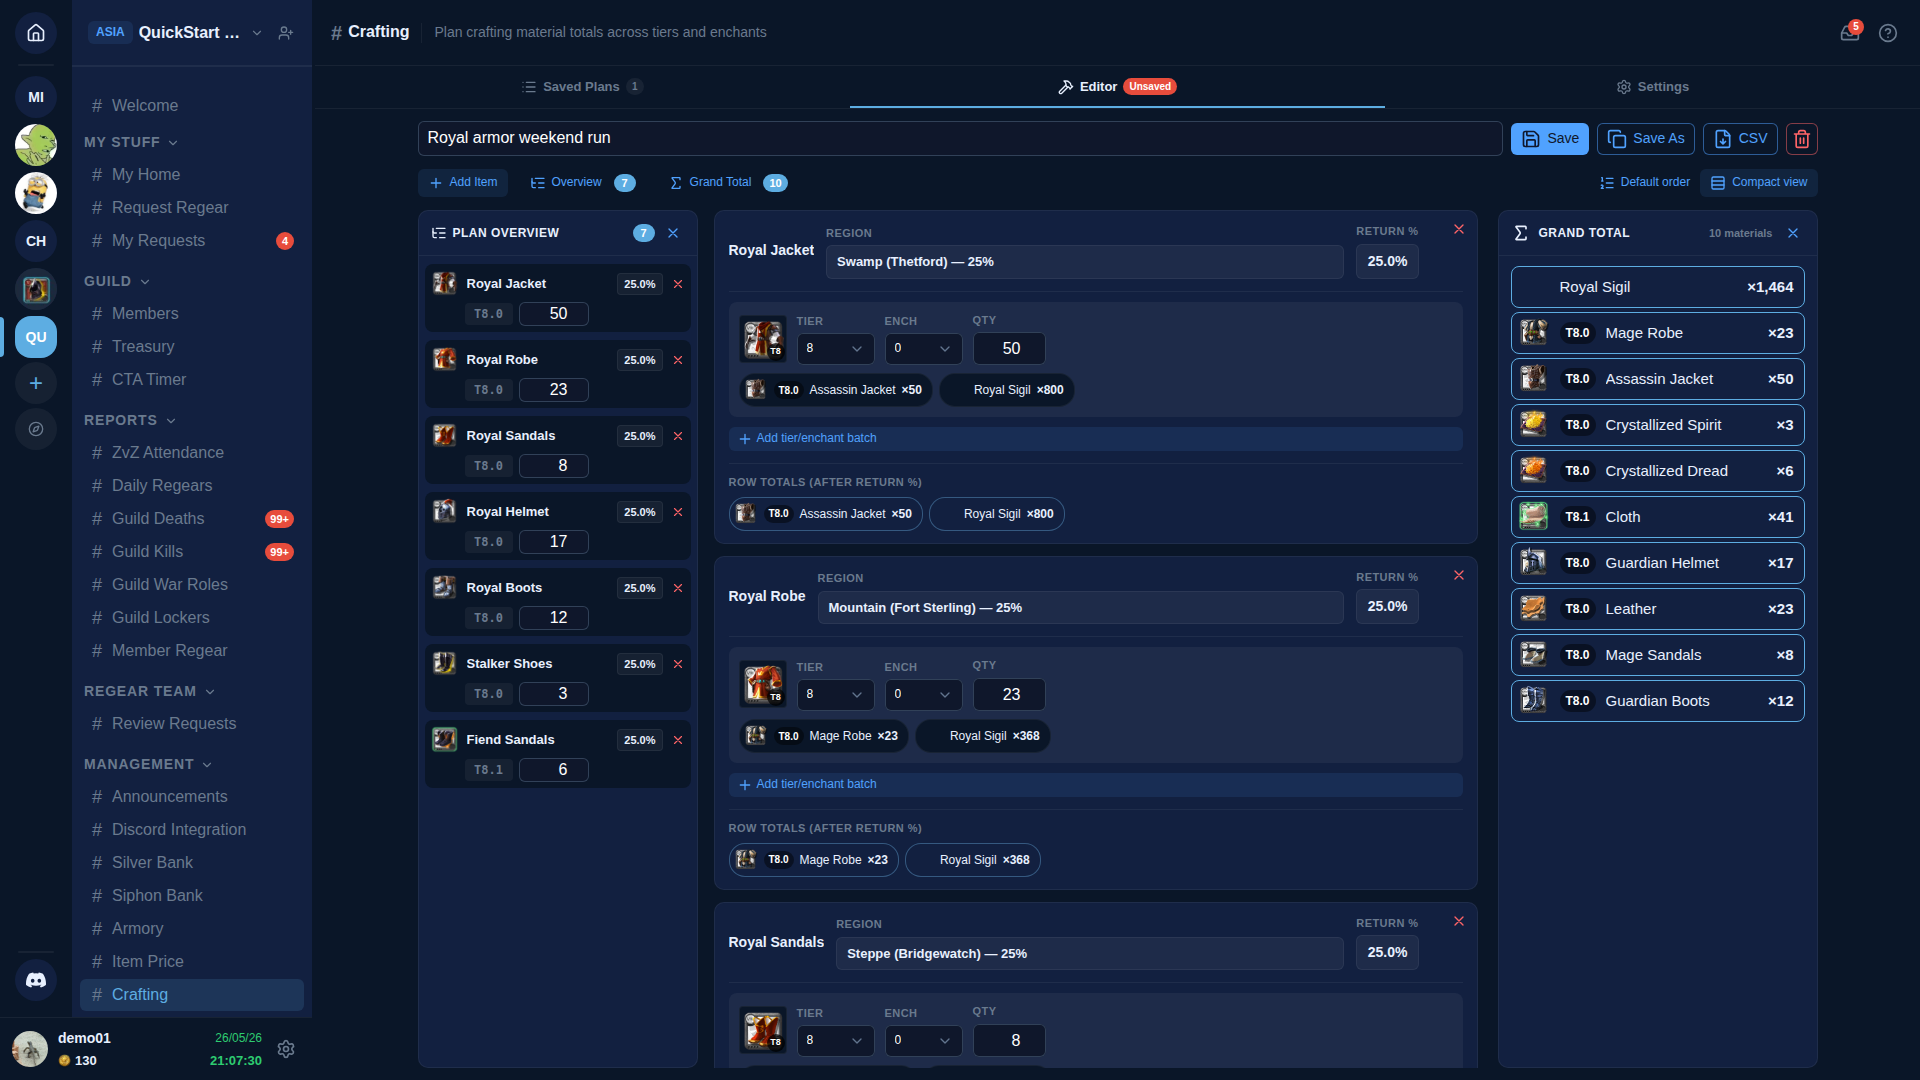
The row header carries the item name + a Region picker filtered to the regions that bonus this item's category. For most items only one region applies (e.g. Bow → Forest), so the planner auto-picks and renders it as a static label instead of a single-option dropdown. When two regions both bonus the same category (e.g. Bow also bonuses at Merlyn's Rest), the picker stays interactive so you can choose between them.
The RETURN % display on the right of the row is the actual percentage the planner uses for the row's math — it reads the saved value from the Settings tab for the picked region.
Batches inside a row
Each row has one or more tier × enchant batches. The default is the highest tier the family supports (T8 for most equipment) at enchant 0. Use the + Add tier/enchant batch button to add more — useful when you want to craft, say, 50 × T8.0 + 20 × T8.1 Bows in one row.
Each batch shows the item icon at the (tier, enchant) selected so you visually confirm what you're planning.
Materials breakdown
Below each batch (when Compact view is off) you'll see chips for every material the batch consumes, after return rate has been applied. Each chip carries:
- The material icon at the right tier.
- A T{base}.{enchant} badge (e.g. T8.0 means tier 8 base, no enchant; T8.1 means tier 8 + 1 enchant).
- The material name (localized to your AO Master language).
- The total count needed.
The ROW TOTALS (AFTER RETURN %) section under each row sums all the row's batches into one combined chip set — handy when a row has multiple batches at different tiers.
Grand Total
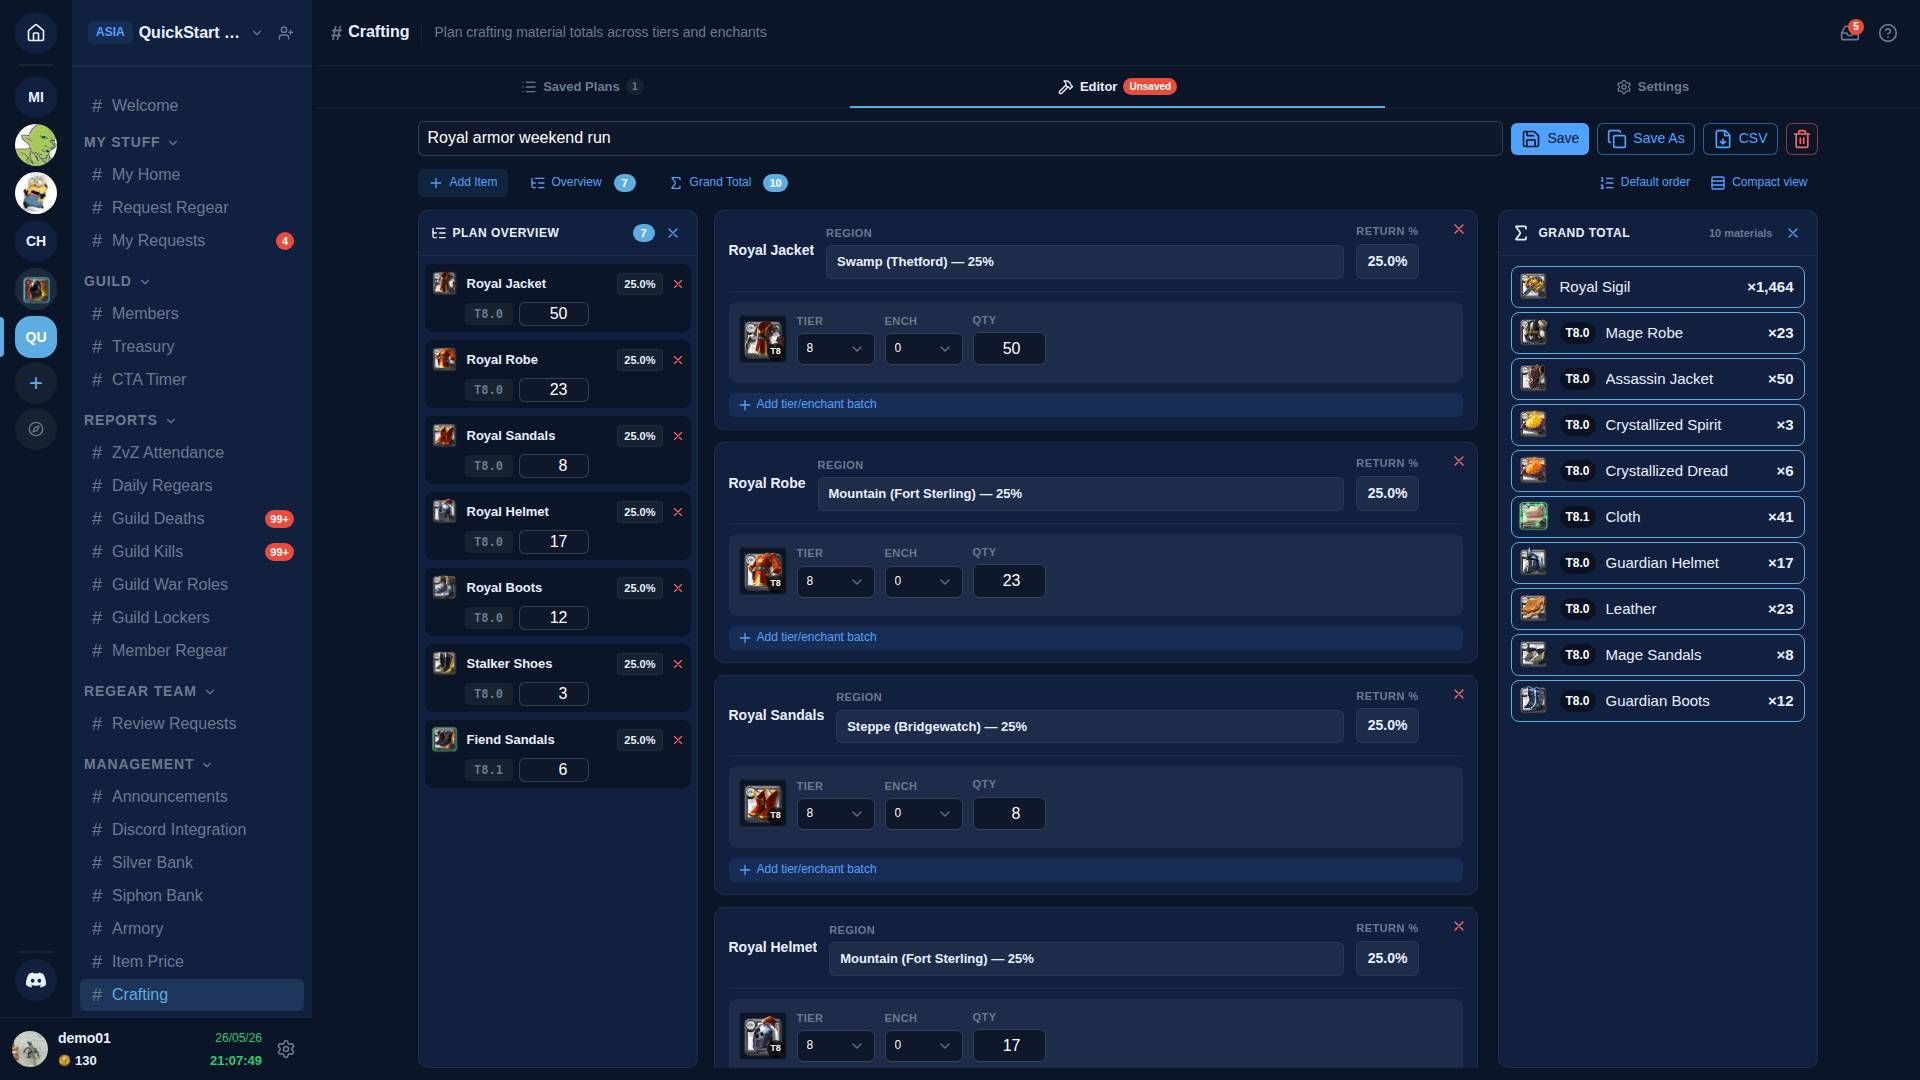
The right rail (desktop) or the Σ Grand Total drawer (mobile) lists every material in the plan, one per row. Each row reads: icon · T{base}.{enchant} precision tier badge · localized name · × total. This is the shopping list — bring exactly these counts to the bank, and you'll have enough to craft everything in the plan (with a small safety pad baked into the math).
Export the entire plan as a CSV with the CSV button in the editor toolbar.
Compact view + sort
Compact view (icon toggle in editor controls) hides per-batch material chips and row totals, collapsing each row to its parent header + batch inputs only. Useful when you've built a long plan and want to scan tier × enchant × quantity in one screen.
Sort by region (the other icon toggle) re-orders the editor rows + the overview rail so all rows at the same region group together. Crafters running a station-by-station planning session (drive to Thetford, craft Royal Jackets; drive to Bridgewatch, craft Cleric Sandals) get a clean per-station read.
Plan Overview rail
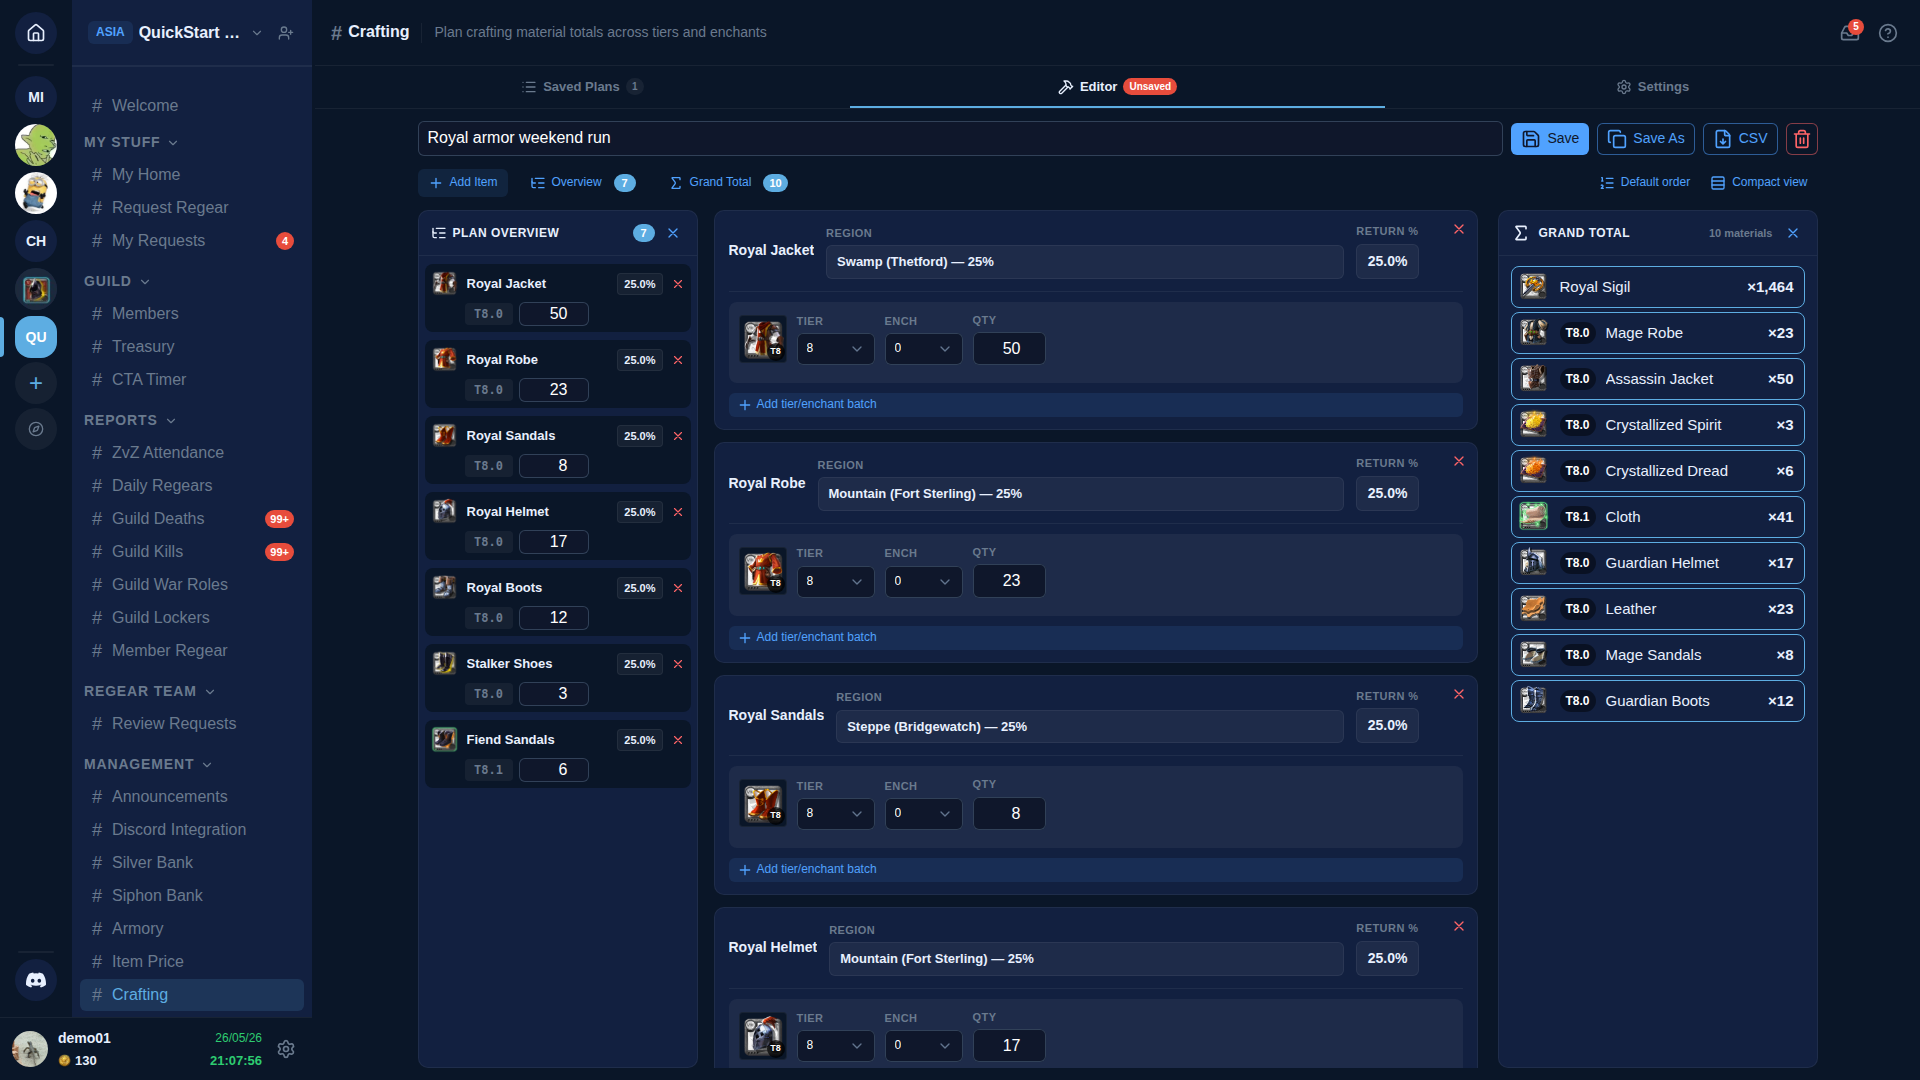
On desktop the Plan Overview pins to the left of the editor and gives you a one-screen view of everything in the plan: item · effective return rate · batches · quantities. On mobile it slides in from the right as a drawer when you tap the Overview button in the editor controls.
Clicking an item name in the overview scrolls the editor to that row's full card so you can edit batches or change region.
Import from Low Stock
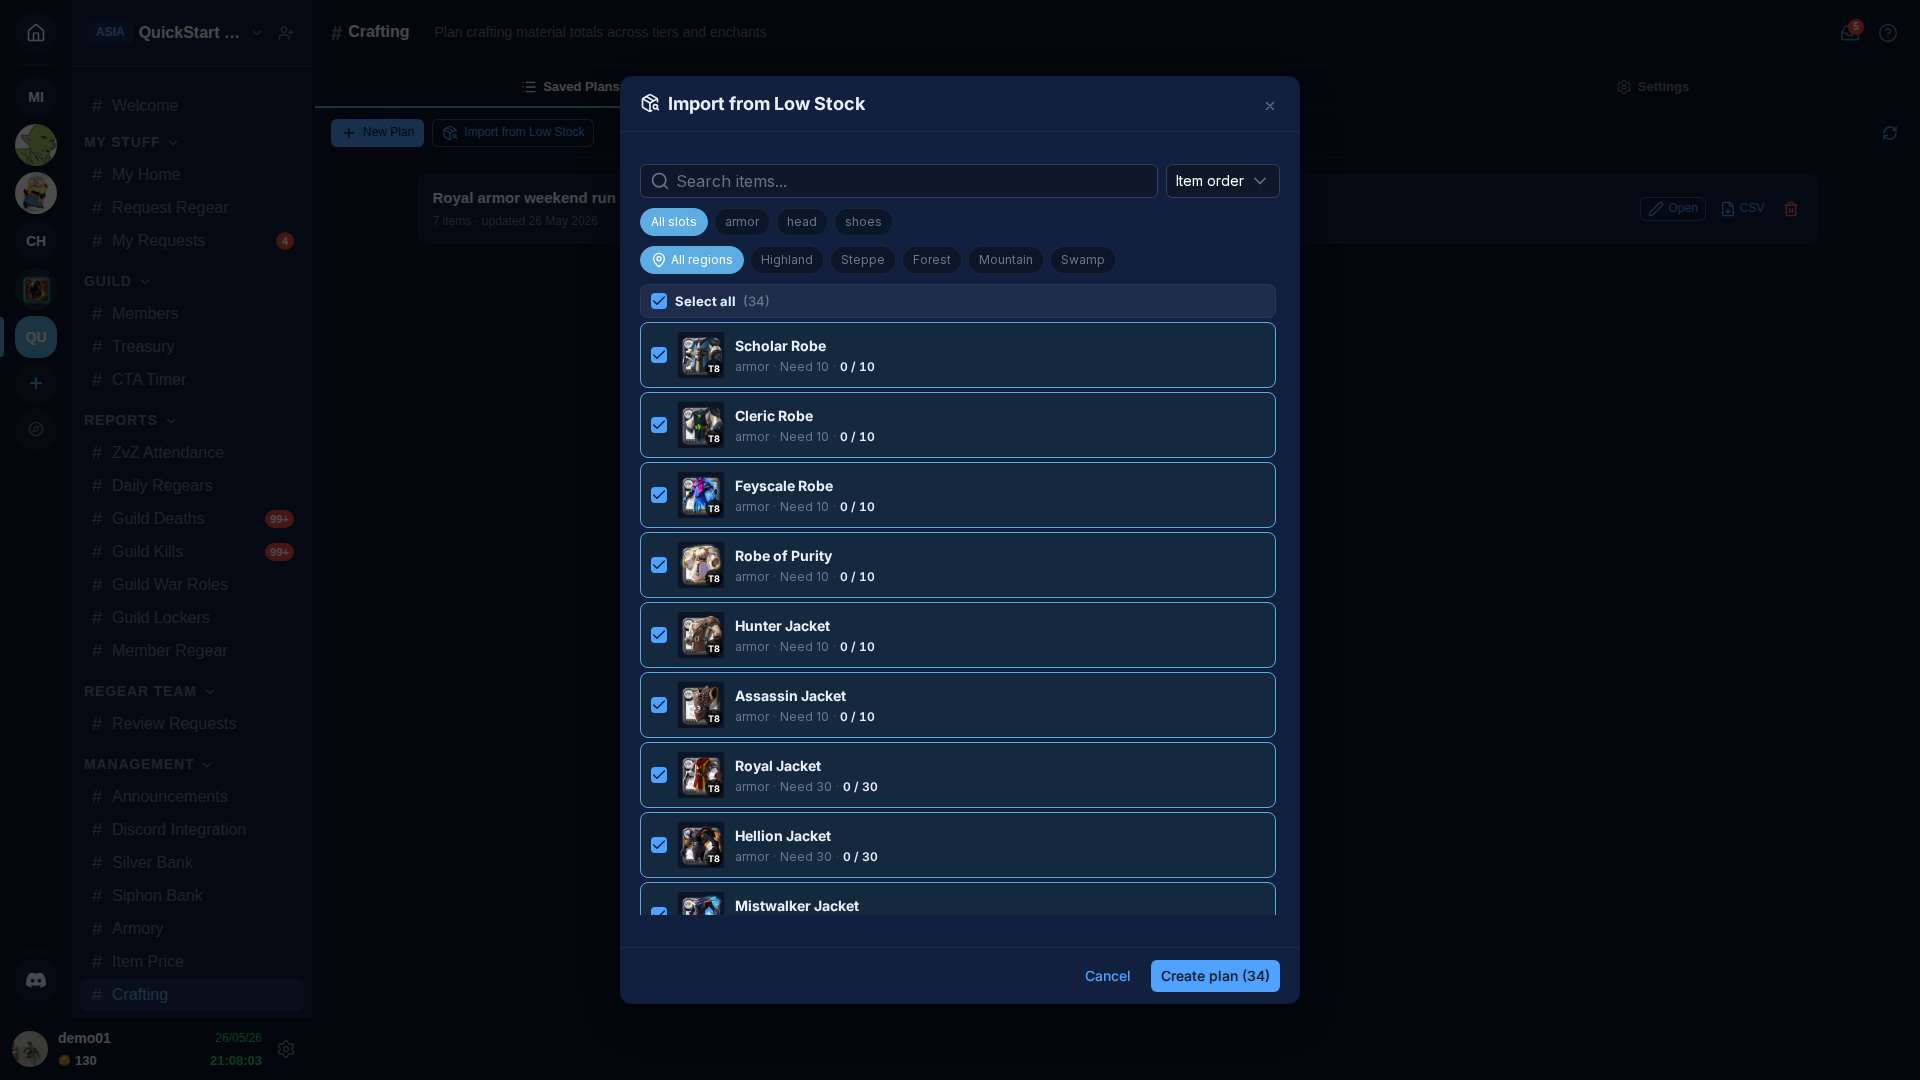
The + Import from Low Stock button on the Saved Plans tab opens a picker that lists every item in your Armory currently below its low-stock threshold. When you confirm, the planner creates a new plan with one row per selected item, batches pre-filled at the deficit (= threshold − current stock). The plan opens in the editor named Low Stock — YYYY-MM-DD — rename it whenever you want.
Inside the modal:
- Select all is on by default. Uncheck rows you don't want to include this run.
- Search by item name or family.
- Slot chips filter by inventory slot (Armor / Head / Shoes / Main Hand / Off Hand / Bag / Cape / Mount / Potion / Food).
- Region chips filter to items a single bonus region covers, so you can build a per-station plan in one click — pick "Steppe" and only items Bridgewatch bonuses show up.
- Sort dropdown picks between Item order (default), Name A→Z, and Qty low→high.
The button only appears when both the Armory system is on for the guild AND you have at least one low-stock threshold configured. With no thresholds, there's nothing to import.
Saving + sharing
- Save writes the current plan to your guild. The plan title is required.
- Save As clones the open plan under a new title.
- CSV downloads the plan as a spreadsheet — one row per material with quantity. Useful for handing the shopping list to a non-AO-Master crafter.
- 🗑 deletes the open plan. Asks for confirmation by retyping the title.
Plans are visible to anyone with View Guild Economy in your guild; editing requires Manage Guild Economy. Other staff see your edits in real time — no refresh needed.
Cross-links
- Armory + Low Stock — the inventory that feeds the Import from Low Stock button.
- #Armory channel reference — quick lookup.
- Subscription tier + billing — Crafting requires Basic tier or higher.